


6
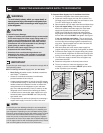
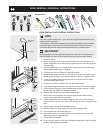
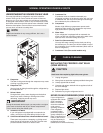
TO REMOVE REFRIGERATOR HANDLE:
(Handlesmaybeeasiertoreversewhiledoorsareoff.)
Figure 1 Style Handles
1. Removetwoscrewsattachinghandletotopof
refrigeratordoor.
2. Removescrewattachingbottomofhandletodoor.
3. Removetwoholeplugsandhingepinplugontopof
doorandinstallonoppositeside.UsePhillipshead
screwdrivertoremoveplasticscrewplugfromfrontof
doorandinstallonoppositeside
Figure 2 Style Handles
1. Removetwoscrewsattachinghandletotopof
refrigeratordoor.
2. Swingtopofhandleawayfromdoorandslidehandle
downandoffofdovetailbutton.
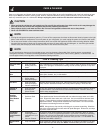
DOOR REMOVAL / REVERSAL INSTRUCTIONS
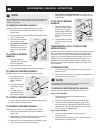
TO REMOVE FREEZER HANDLE:
(Handlesmaybeeasiertoreversewhiledoorsareoff.)
1. Removetwoscrewsattachinghandletobottomof
freezerdoor.
2. Removeshorttrimpiecebyslidingtrimstraightupand
offofhandlebracket.
3. Removescrewattaching
topofhandletodoor.
4. Self-Adhesive Nameplate
Models:Gentlypeeloff
nameplatefromdoorand
reapplyoveroldhandle
holes.
TO ATTACH FREEZER
HANDLE:
1. Reinstallhandleon
oppositeside,usingsame
holeasnameplate.
2. Attachhandletobottomofdoor.
3. Slidetrimpiecestraightdownontohandlebracket.
Handle
Screw
Screw
Self Adhesive
Nameplate
(some models)
Nameplate
T rim
Handle
Screw
Screw
Dovetail
Button
Lock Handle
over
Dovetail Button
Self Adhesive
Nameplate
(some models)
Nameplate
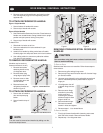
TO REMOVE FREEZER HANDLE:
(Handlesmaybeeasiertoreversewhiledoorsareoff.)
1. Removetwoscrewsattachinghandletobottomof
freezerdoor.
2. Swingbottomofhandleawayfromthedoorandslide
handlestraightupandoffofdovetailbutton.
3. Removescrewanddovetailbuttonandinstallonother
side,usingthesameholesasnameplate.
TO REMOVE FREEZER HANDLE:
(Handlesmaybeeasiertoreversewhiledoorsareoff.)
1. Removetwoscrews
attachinghandleto
bottomoffreezer
door.
2. Removebuttonplug
usingedgeofputty
knife.
3. Removescrewon
sideoffreezerdoor
andremovehandle.
TO ATTACH FREEZER HANDLE:
1. Securesideofhandletodoorandreplacebuttonplug.
2. Securehandletobottomofdoor.
TRIM REMOVAL (FULL-LENGTH TRIM
MODELS ONLY)
Insomemodels,therefrigeratordoorhasafulllengthtrimpiece
whichcontinuesfromthebottomofthehandletothebottom
ofthedoor.Thetopofthetrimattachestothehandlebracket
(Figure1)ortsaroundthebaseofthehandle(Figure2).An
adhesive“trimlock”ispositionedabouthalfwaydown.The
bottomofthetrimisheldinplacebyeitheranadhesivetrim
lock,oratrimlockwithtwoprongsinsertedintoaholeonthe
faceofthedoor.
TO REMOVE TRIM:
1. Removetrimbygentlypullingtrimlockareasoutand
awayfromdoor.
2. Whentrimisfreefromdoor,slidethetrimstraightdown
andawayfrombaseofhandle.
4. Self-Adhesive Nameplate Models: Useputtyknifeto
gentlypeeloffnameplatefromdoorandreapplyoverold
handleholes.
TO ATTACH FREEZER
HANDLE:
1. Startwithhandleoffset
awayfromdoor.Placetop
ofhandleoverdovetail
button,swinghandleinto
uprightpositionandpull
downward,lockingitinto
place.
2. Securebottomofhandle
withtwoscrewsremoved
earlier.
NOTE
Formodelswithshorthandletrim,removebyslidingtrim
straightdownandoffofhandlebracket.
NOTE
Somemodelshave“pocket”handles,whicharerecessedinto
thesidesofthedoor.Onthesemodels,onlythehingeswill
needtobereversed.