


7
Starting up and temperature regulation
Wash the inside of the appliance with lukewarm water with a little bicar-
bonate of soda added (5ml to 0,5 litre of water). Do not use soap or deter-
gent as the smell may linger. Dry the appliance thoroughly.
• When the refrigerator compartment door is opened, the internal lighting
is switched on. The temperature control knob is located on the right hand
side of the refrigerator compartment.
Setting “0”: Off.
Setting “1”: Hightest temperature, (warmest setting).
Setting “6” (end-stop) : Lowest temperature, (coldest setting).
The exact setting should be chosen keeping in mind that the temperature
inside the refrigerator depends on:
-the quantity of food stored
-how often the door is opened
-ambient temperature
The temperatures in the refrigerator compartment and freezer compart-
ment cannot be independently regulated.
If you want to freeze fresh food rapidly, select setting “6”, ensuring that the
temperature in the refrigerator compartment does not drop below 0°C. You
should reset the temperature control knob to setting “3” or “4”, if this does
occur.
As soon as the fresh food placed in the freezer has frozen, return the tem-
perature control knob to “3” or “4”.
Important!
High ambient temperatures (e.g. on hot summer days) and a cold setting on
the temperature regulator (position"5" to "6") can cause the compressor to
run continuously.
If this happens, turn the temperature regulator back to a warmer setting
(position "3" to "4"). At this setting the compressor will be switched on and
off as usual and automatic defrosting recommenced.
18
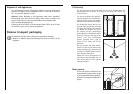
Installation
Electrical Connection
Any electrical work required to install this appliance should be carried
out by a qualified electrician or competent person.
WARNING – THIS APPLIANCE MUST BE EARTHED
The manufacturer declines any liability should these safety measures not
be observed.
Before switching on, make sure the electricity supply voltage is the same as
that indicated on the appliance rating plate. The rating plate is inside, on the
left.
The appliance is supplied with a 13 amp plug fitted. In the event of having
to change the fuse in the plug supplied, a 13 amp ASTA approved (BS 1362)
fuse must be used.
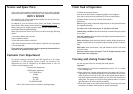
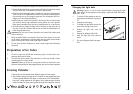
Important!
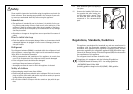
The wires in the mains lead are
coloured in accordance with the fol-
lowing code:
Green and Yellow Earth
Blue Neutral
Brown Live
As the colours of the wires in the
mains lead of this appliance may not
correspond with the coloured mark-
ings identifying the terminals in your
plug, proceed as follows:
1. The wire coloured green and yellow must be connected to the terminal
marked with the letter “E” or by the earth symbol or coloured green and yel-
low.
2. The wire coloured blue must be connected to the terminal marked “N” or
coloured black.
3. The wire coloured brown must be connected to the terminal marked “L” or
coloured red.
4. Upon completion there must be no cut, or stray strands of wire present and
the cord clamp must be secure over the outer sheath.
Warning! A cut-off plug inserted into a 13 amp socket is a serious safety
(shock) hazard. Ensure that the cut-off plug is disposed of safely.
D207
GREEN & YELLOW
13 AMP. FUSE
BROWN
CORD CLAMP
BLUE
13 AMP