OPERATING INSTRUCTIONS
Page 6 62.9694.01
4.3 Automatic cooking
Switching on
Switch on the control switch (S) turn from position 0 to I. This
switches on the temperature pre-setting function. The lamp
(LS) lights up.
0 = Off
I = On
Set the desired cooking temperature (flashing nominal
value) with the temperature selection knob (T) on the display
(AT).
Turn right = increase
Turn left = reduction
Smallest change = 1°F
Programming the cooking time and the starting time (or
only one function).
Pressing the button (DT) switches on the programme for the
cooking time (flashing nominal value). The desired cooking
time is set with the cooking time knob (D) on the display (AD).
Turn right = increase
Turn left = reduction
Smallest change = 1 minute
The lamp (LD) only lights up when the desired temperature
has been reached and the cooking time expires.
The following pre-programmed nominal functions
Cooking temperature
Cooking time
are all activated by pressing the button (TT).
The following displays
Cooking temperature (AT)
Remaining cooking time (AD)
indicate the current value.
The lamp (LT) will continue to flash until the nominal cooking
temperature is reached. It then stays on permanently.
4.4 Shutting down
An acoustic signal sounds when cooking is over. This is
acknowledged by pressing the button (Q).
The power supply is then switched off.
All activated functions are subsequently switched off:
• Press the pre-set temperature button (TT) for some sec-
onds.
Lamp (LT) goes out.
• Press the cooking time button (DT).
Lamp (LD) goes out.
• Switch off the control switch (S).
Turn from position I to 0.
Lamp (LS) goes out.
• Switch off the power isolator (H) (only available as an
option).
• Turn from position I to 0.
0 = Off
After cooking has been completed, the control switch (S) is
switched off.
• Turn from position I to 0.
0 = Off
• The lamp (LS) goes out.
• Switch off the power isolator (H) (only available as an
option).
Turn from position I to 0.
0 = Off
The appliance can be switched off before cooking has been
completed.
If the function buttons (TT), (DT) and (ZT) are switched on and
switching off is only done by means of the control switch (S),
all the functions and previously set data for temperature, cook-
ing time and starting time remain saved and active when the
switch (S) is turned on again.
If the appliance develops a fault, the electrical switch in the
building must also be switched off.
4.5 Additional functions
SOFT
Pressing the Soft button (R) adapts the power supply to the
food, i.e. reduces it.
The lamp (LR) on the button (R) lights up if the soft setting has
been switched on.
The following functions are activated by pressing button (Q):
1. All displays
Food temperature (AT)
Cooking time (AD)Starting time (AZ)
flash indicating the nominal value that has been pro-
grammed in.
2. Acknowledgement of the acoustic signal when cooking has
been completed.
3. Acknowledgement of error messages (see section 12,
Troubleshooting).
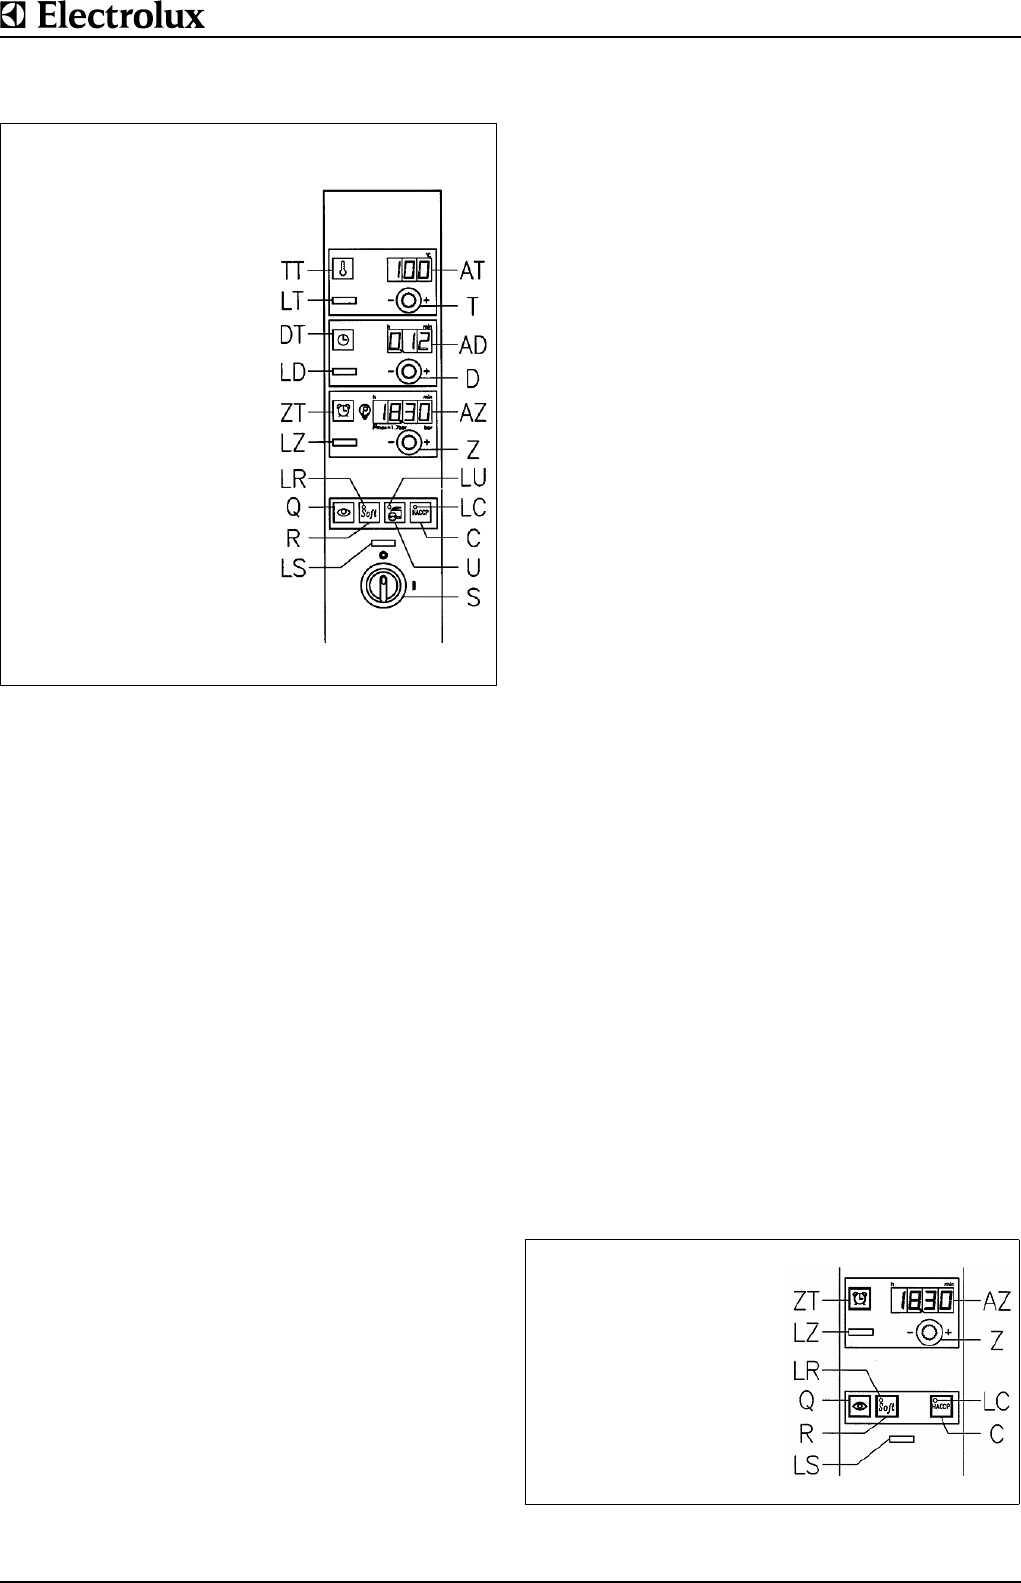
TT Button, activation of settings
LT Lamp, cooking temperature
DT Button, cooking time
LD Lamp, cooking time expires
ZT Button, starting time
LZ Lamp, starting time
LR Lamp, soft settings
Q Button, acoustic signal
R Button, soft
LS Lamp, temperature
pre-setting
AT Display, cooking tempera-
ture
T Temperature selection knob
AD Display, remaining cooking
time
D Cooking time knob
AZ Display, time
Z Starting time knob
LU
LC
C
U
S Control switch
Fig. 3 Right console
ZT Button, starting time
LZ Lamp, starting time
LR Lamp, soft settings
Q Button, acoustic signal
R Button, soft
LS
LC
C
U
Fig. 4 Right console


