


39
S
9S
2
1
6
6
4
7
5
8
12
13
13
14
15
15
4
4
11
9S
9S
9K
9K
9K
9K
4
Ø 120mm
10S
14
7
K
9K
9K
6
6
7
7
3
3
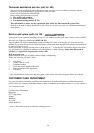
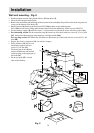
Installation
Wall unit mounting - Fig. 8
• Put the template onto the wall (1) and drill two Ø12mm holes (2).
• Fit two hooks (3) on the drilled holes.
• Remove the metal filters (4) and hang the hood on the hooks and adjust the position of the hood using the two
screws on the bottom of the hooks (5).
• Mark 2/4 points (6). Remove the hood and drill 2/4 Ø8mm holes on the marked points.
Fit 2/4 Ø8mm wall dowels, Hang again the hood and fix the hood definitively with 2/4 screws 5X45 (7).
• Fix the chimney support (8) with two screws 5 x 45 mm and two wall dowels on the wall close to the ceiling.
• For exhausting version: Fit the connection ring (S) on the top of the hood with two screws Ø 3,5 x 6,5 mm
(9S) then fit an axhausting pipe long enough to reach the outside (10S).
For recycling version: Fix definitively the deflector (K) on the top of the hood with two screws Ø 3,5 x 6,5
mm (9K).
• Prepare the electric connection (11) (see relative chapter).
• Fit the chimney (12) and fix it on
the chimney support with two
screws 3,0 x 9 mm (13).
The lower part of the chimney
must be slided down and inserted
on the housing on the upper part of
the hood (14).
• Fit the two grids (15) on both
sides of the chimney.
Fig. 8