12
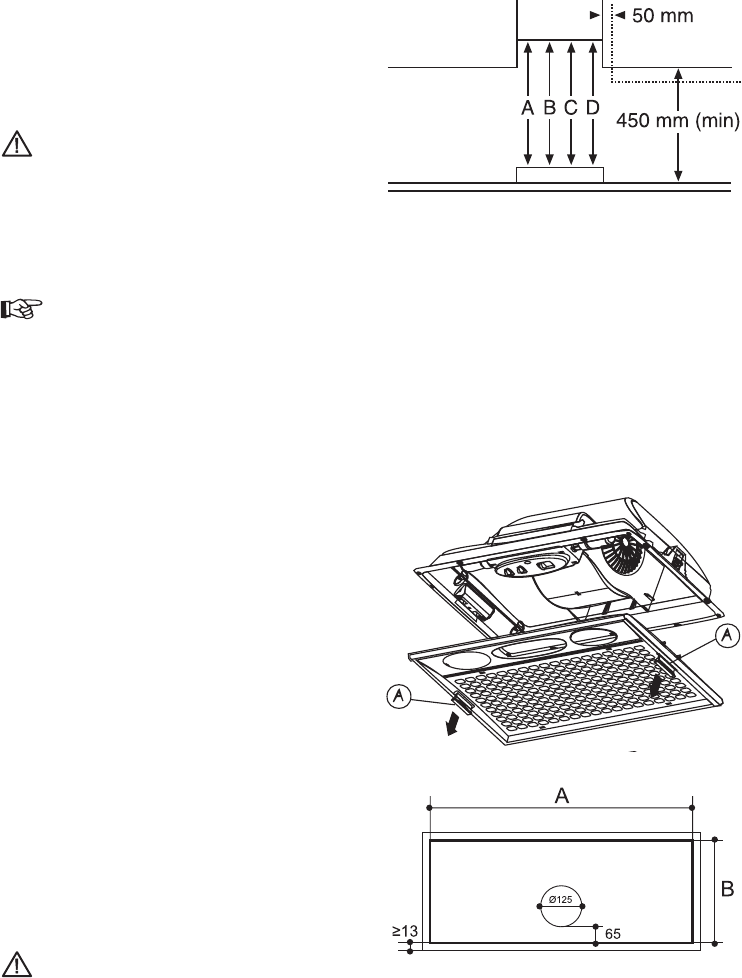
A: Built-in Electric Hob: 650mm minimum clearance
B: Built-in Gas hob: 700mm minimum clearance
C: Slot-in Electric Cooker: 685mm minimum clearance
D: Slot-in Gas Cooker: 787mm minimum clearance
Hob
When installed between adjoining wall cabinets, the
wall cabinets must not overhang the hob and the
distance between the underside of the cabinet and the
worktop must be 450mm. If the height of the wall
cabinet is less than 450mm, a gap of 50mm must be
maintained either side of the hob.
This cooker hood must not be installed above a
cooking appliance with a high level grill.
Unpacking
The fittings supplied to install this cooker hood can be
found with the instruction book inside the packaging:
120 - 125 mm ducting collar
Fitting the Cooker Hood into the
Housing/Canopy
The hood is fixed to the housing using the screw holes
located around the base of the casing. Access to the
screw holes will require the removal of the metal grille
panel.
Positioning the Cooker Hood
Measure the underside of the canopy or kitchen
cabinet to mark the position for the cut-out. The cut-
out measurement should be:
- 497mm (19 5/8”) wide
- 259mm (10 1/4”) deep
Check the position of the hole is correct with the
measurements above before making the cut-out.
The hood is fixed using the holes located in the rim
around the base of the casing visible when the inlet
grille is in the open position.
Support the grille panel with one hand and draw down
on the two grey handles (A) which are located on each
side of the grille with the other hand.
Raise the hood into the cut out and mark the positions
for the fixing screws. Pilot drill the fixing holes and fit
the hood.
Venting
The hood is more effective when used in the
extraction mode (ducted to the outside). Venting kits
maybe purchased through your retailer or DIY store,
and must be ducted to an outside vent of 125mm (5”)
minimum.
The ducting used must be manufactured from
fire retardant material.
When the hood is ducted externally the charcoal filters
must be removed.


