• Remove all packing material and any promotion material
from the microwave oven.
• Examine the oven for any damage such as dents or
a broken door. Do not install if the oven is damaged.
Call the service center.
• Remove the protective film on the oven cabinet surface.
Do not remove the light brown Mica cover that is attached
to the oven cavity to protect the magnetron.
• Do not leave the packing material so that small children
can play with it. This can be hazardous.
• Select a flat, level surface that provides enough open
space for the intake and outlet vents and that is strong
enough to bear the weight of the oven. A minimum
clearance of 3.0 inches (7.5cm) is required between the
oven and any adjacent walls. Leave a minimum
clearance of 12 inches (30cm) above the oven. Blocking
the intake or outlet vents can damage the oven. If air
vents are blocked during operation, the oven may
overheat, and this may lead to malfunctioning. Hot air
escapes from the vents, so be sure not to obstruct it or
let curtains come between the oven and the rear wall.
NOTE: It is recommended to have greater than 7.5cm
clearance on at least one of the sides to improve product
performance and operation.
• The oven should be placed in a stable position to avoid
the possibility of causing vibration or noise.
• Do not remove the legs from the bottom of the oven.
• This oven should only be installed freestanding; not
built-in or in a cabinet.
• Keep the oven away from heat and water.
Exposure to heat and water can lower the efficiency
and lead to malfunctioning.
• Place the oven as far away from radios and TV as
possible. Operation of the oven may cause interference
to your radio or TV reception.
• When there is interference, it may be reduced or
eliminated by taking the following measures:
+ Clean door and sealing surface of the microwave oven.
+ Reorient the receiving antenna of the radio and/or
television.
+ Move the microwave oven away from the receiver.
+ Plug the microwave oven into a different outlet so
that microwave oven and receiver are on different
branch circuits.
• Be sure the voltage and frequency where you connect
the microwave oven is the same as specified on the
rating plate on the microwave oven. If the microwave oven
is connected to the socket via an extension cord, make
sure the cord is earthed.
If installed near or over a heat source, the microwave oven
could be damaged.
This microwave oven must not be used on a non-earth
protected power supply. Contact an electrician if you are
uncertain regarding electrical connection of the oven or
provision of earth protection of the supply.
If the power cord is damaged, it must be replaced by the
manufacturer, its service agent or similarly qualified persons
in order to avoid a hazard.
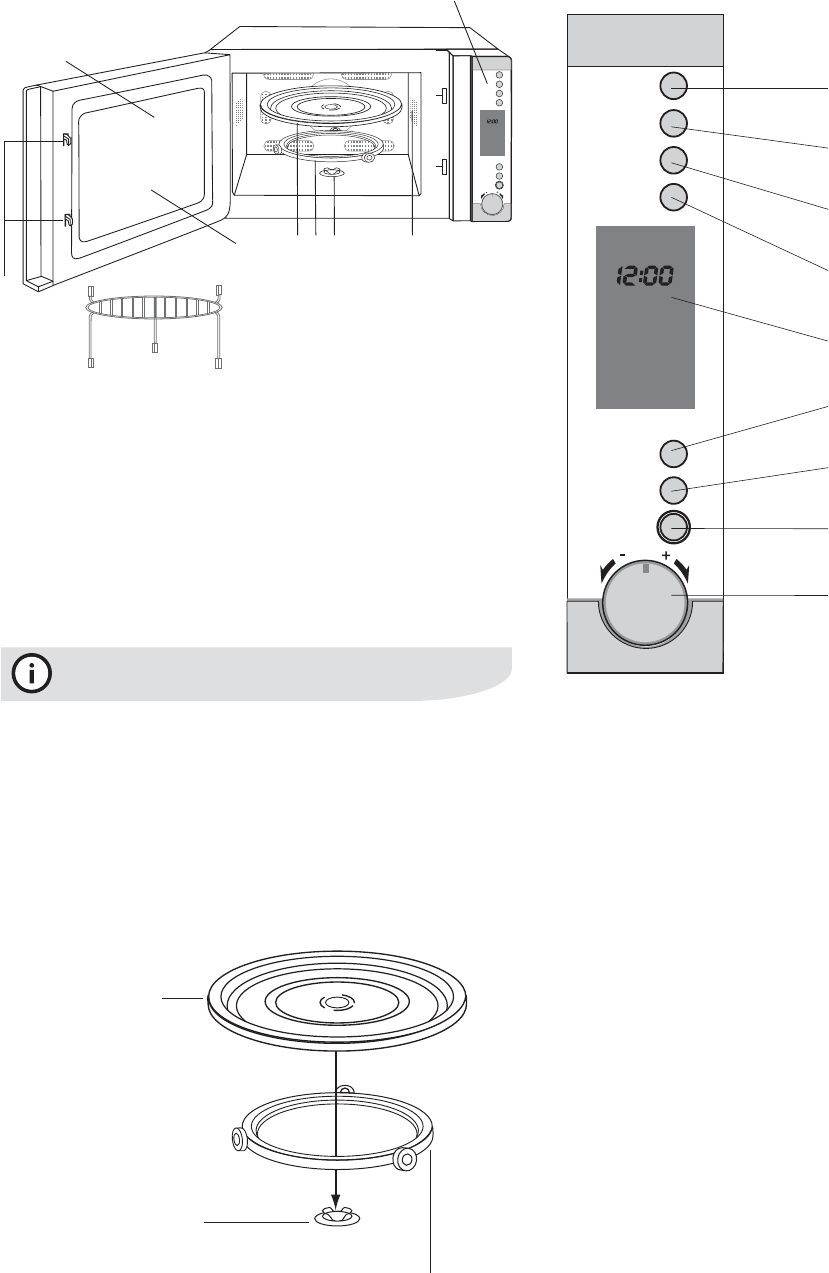
Turntable installation
1 Place the turntable ring assembly on the cavity bottom.
2 Place the glass tray on top of the turntable support.
• Do not place the glass tray upside down.
• Both glass tray and turntable ring assembly must always
be used during cooking.
• Always place food and food containers on the glass tray
when cooking.
• If the glass tray or turntable ring assembly cracks or
breaks, contact your nearest authorized service center.
Control panel
1. cooking function
select microwave power, grill, convection or
combination cooking modes
2. power level
select desired microwave power level
3. auto reheat
select desired reheat mode
4. defrost
select defrost by weight or time
5. display window
view cooking time, power level, cooking mode, and
time of day
6. clock
set the time of day and delayed start
7. stop/clear
stop or pause your microwave oven program, or exit
the cooking program setting
8. start/go
start your microwave oven
9. control knob
select cooking mode and time
OPERATION
warning
warning
warning
tips and information
Glass tray
Turntable shaft
Turntable ring assembly
INSTALLATION
30cm
7.5cm
7.5cm
7.5cm
convection+grill
E
G
F
A
A) Control panel
B) Turntable shaft
C) Turntable ring assembly
D) Glass tray
E) Observation window
F) Door assembly
G) Safety interlock system
H) Mica cover – DO NOT REMOVE
cooking
function
power
level
clock
stop/clear
start/go
auto
reheat
defrost
D C B H
Grill rack
cooking
function
power
level
clock
convection+grill
stop/clear
start/go
auto
reheat
defrost
1
2
3
4
5
6
7
8
9
6 installation electrolux microwave oven electrolux microwave oven operation 7


