Defrosting
The refrigerator automatically defrosts every time the
compressor stops. The water is discharged, via the
pipe, into a tray located at the back of the appliance
above the compressor, where it evaporates.
Important
To avoid defrost water overflowing into the fridge,
periodically clean the water discharge hole in the centre
of the V shaped drip collector at the back of the
refrigerator compartment behind the fruit and vegetable
drawer. Use the defrost cleaner provided which you will
find already inserted into the discharge hole.
Remember to wash the defrost cleaner in hot soapy
water at regular intervals. Dry throughly before
replacing.
D037
MAINTENANCE AND CLEANING
External cleaning
Many proprietary kitchen surface cleaners
contain chemicals that can attack/damage the
plastics used in this appliance. For this reason it
is recommended that the outer casing of this
appliance is only cleaned with warm water with a
little washing-up liquid added.
An accumulation of dust will affect the performance
of the appliance and cause excessive electricity
consumption.
You MUST ensure that the appliance is switched
OFF.
Once or twice a year dust the condenser (black grill)
and the compressor at the back of the appliance,
with a brush or vacuum cleaner, see diagram.
PR259
Before any maintenance or cleaning work is carried
out, DISCONNECT the appliance from the
ELECTRICITY supply.
Internal cleaning
Clean the inside and accessories with warm water
and bicarbonate of soda (5ml to 0.5 litre of water).
Rinse and dry thoroughly.
NEVER USE DETERGENTS, ABRASIVE
POWDERS, HIGHLY PERFUMED CLEANING
PRODUCTS OR WAX POLISHES,TO CLEAN
THE INTERIOR AS THESE WILL DAMAGE THE
SURFACE AND LEAVE A STRONG ODOUR.
Clean the drain hole of the water trough at regular
intervals and make sure that the drain hole is never
obstructed, so that the defrost water may flow freely.
Changing the light bulb
Should the interior light fail to work, first switch off
the appliance and disconnect from the electricity
supply, then replace the bulb as follows;
Unscrew the light cover and then pull it outward by
pressing as shown in the figure. Unscrew the bulb
and replace it with a new 15 watt bulb (available from
your nearest Electrolux Service Force Centre).
Replace the light cover by sliding it into its original
position and replacing the screw.
D411
When the appliance is not in use
When the appliance is not in use for long periods,
disconnect from the electricity supply, empty all
foods and clean the appliance, leaving the doors ajar
to prevent unpleasant smells.
6
11
INSTALLATION
Positioning
This appliance should only be installed at a location
where the ambient temperature corresponds to the
climate classification indicated on the rating plate, which
is located at the left on the inside of the appliance.
The following table shows which ambient temperature is
correct for each climate classification:
SN +10°C to + 32°C
N +16°C to + 32°C
ST +18°C to + 38°C
T +18°C to + 43°C
It should be located in a dry atmosphere, out of direct
sunlight and away from extreme temperature e.g. not next
to a boiler or radiator, or in a very cold room e.g. an
outhouse, where the temperatures may fall below 10°C
(50°F). If these temperatures are exceeded i.e. colder or
warmer, then the appliance may not operate correctly.
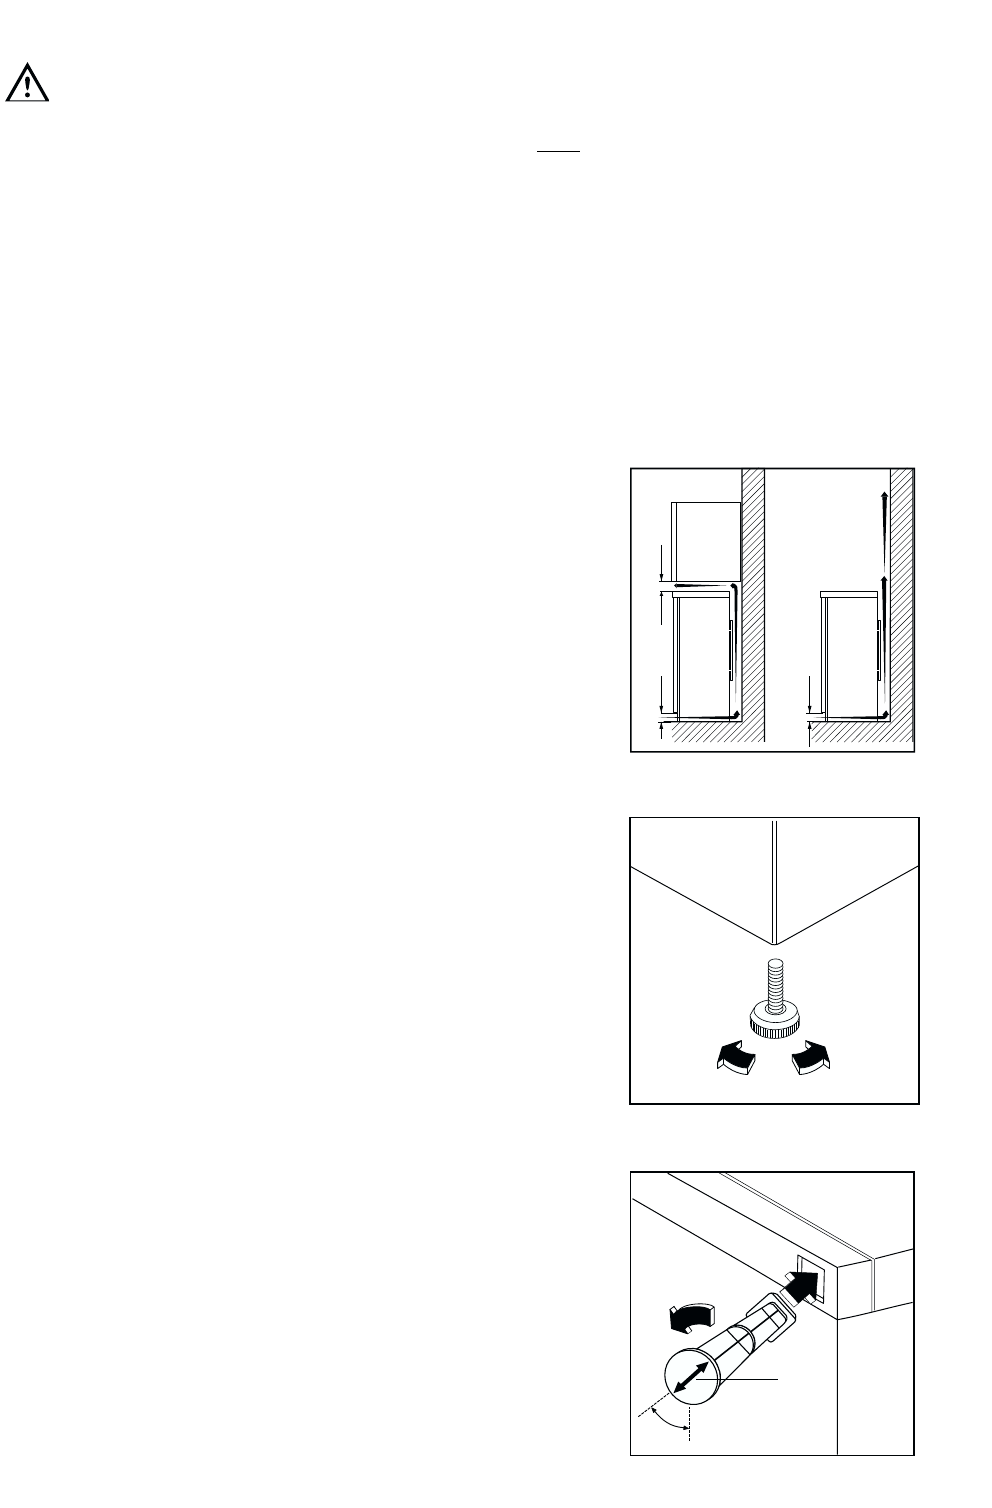
You should also ensure that air can circulate freely around
the back and the top of the cabinet. There must also be at
least 100 mm (4”) distance between the top of the cabinet
and any overhanging kitchen furniture (A). Ideally, the
appliance should not be positioned beneath overhanging
furniture (B).
There should also be a gap of 25 mm either side of the
appliance. Do not obstruct the space underneath. The
back of the cabinet may be placed close to the wall but
must not touch it. DO NOT install in places with restricted
ventilation.
Adjust the level of the appliance by screwing out the
adjustable foot, or feet, at the bottom of the cabinet using
your fingers or a spanner (see figure).
D200
100 mm10 mm
10 mm
A
B
NP00
Warning
IF YOU ARE DISCARDING AN OLD APPLIANCE
THAT HAS A LOCK OR CATCH ON THE DOOR,
YOU MUST ENSURE THAT IT IS MADE
UNUSABLE TO PREVENT YOUNG CHILDREN
BEING TRAPPED INSIDE.
Depending upon the position which you choose for
your appliance, you may wish to reverse the way in
which the door opens. To do this, refer to instructions
on “Door reversal directions”.
Important
It m
ust
be possible to disconnect the appliance from
the mains power supply; the plug must therefore be
easily accessible after installation.
Rear spacers
The plastic bag containing all relevant
documentation also contains two spacers to be fitted
into special holes in the back of the appliance.
Fit the spacers into the holes, taking care to ensure
that the arrow (A) is positioned as shown in the
diagram. Then turn them through 45° (arrow (A)
vertical) until they lock into place.
PR60
A
45°


