3
Fastening to the wall
Warning!
The appliance must be fastened to the wall for
safety reasons.
Take the bag supplied with the appliance. It contains
the following accessories:
2 brackets
4 wall plugs (for fixing to masonry wall)
4 wall plugs (for fixing to dry lined walls)
4 screws
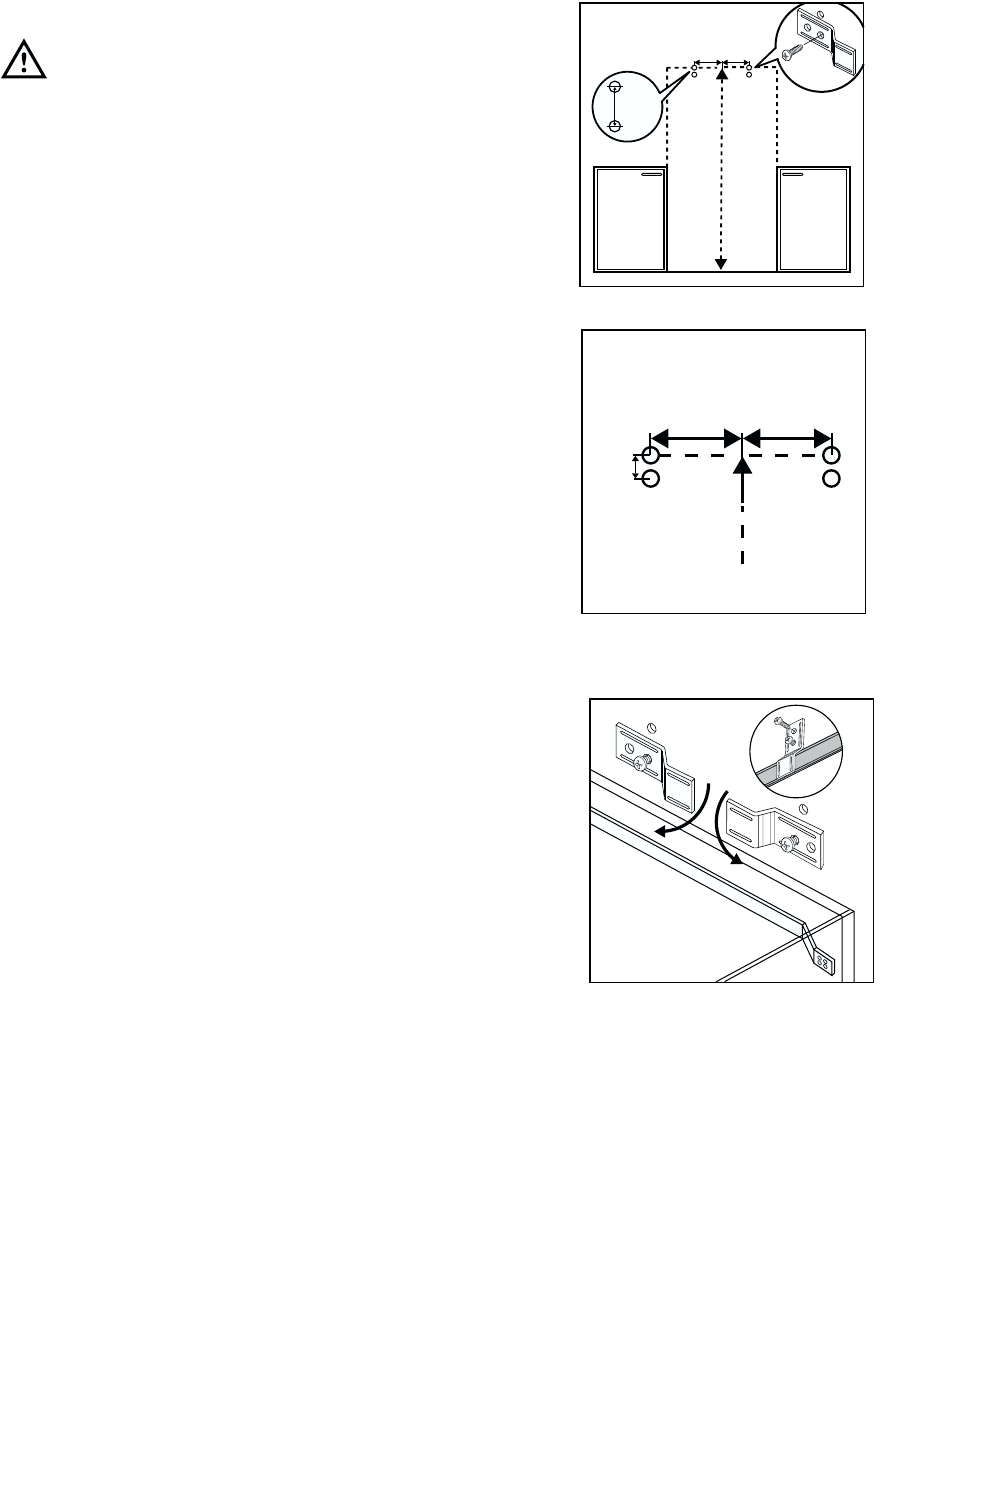
Proceed as follows to carry out the fastening:
1. Find the appliance’s positioning center.
2. Measure 200 cm from the floor. At the point
where the height and the centre meet measure
15 cm to right and 15 cm to the left. Make two 8
mm holes on the left with a drill bit.
3. Repeat the operation on the right with the drill
(see figure).
For masonry walls:
4. Insert the 4 metal wall plugs and tighten the
screws.
5. Fasten the brackets horizontally in the lower set
of holes as illustrated in the figure after having
previously removed the screws.
6. Push the appliance towards the wall and turn the
brackets downwards 90°. Make sure that the
lower part of the brackets is located between the
appliance and the plate.
7. Insert the second set of screws in the upper
holes and complete the fastening.
For dry lined walls:
4. Insert the wall plugs by screwing them into the
holes drilled previously.
5. Fasten the brackets horizontally in the lower set
of holes with the screws as illustrated in the
figure.
6. Push the appliance towards the wall and turn the
brackets downwards 90°. Make sure that the
lower part of the brackets is located between the
appliance and the plate.
7. Tighten the screws previously loosened and
complete the fastening with the second set of
screws.
Once the appliance is fastened to wall, make sure
that it is stable.
D742
200 cm
1,5 cm
15 cm 15 cm
D753
15 cm 15 cm
1,5 cm
200 cm
D743
90°
18
Door reversal directions
Before reversing the door make sure that the
following tools are available:
1 cross-slotted screwdriver
1 slotted screwdriver
1 10 mm wrench
The accessory bag containing:
door fastener
In order to reverse the door proceed as follows:
1. Disconnect from the electricity supply.
2. Gently lay the fridge/freezer on its back with the
top held away from the floor by 5-8 cm (2-3
inches) of packing;
3. Remove the ventilation grill (D).
4. remove the bottom hinge (E) by unscrewing its
three fixing screws;
5. Remove the lower door by sliding it out of the
middle hinge (I). Remove the hole cap for the
hinge pin and mount it on the other side;
6. Remove the lower middle hinge (I), remove the
pin and mount it on the other side;
7. Remove the screw hole cover caps (L) on the
plate on the other side and mount them where
the hinge has just been removed;
8. Mount the hinge on the other side;
9. Mount the lower door;
10.Remove the pin of the lower hinge and mount it
on the other side;
11.Mount the lower hinge (E) on the other side,
remove hole cap (F) from the aeration grid (D) by
pressing it in the direction indicated by the arrow
and mount it on the other side;
12.Mount the aeration grid (D) again by snapping it
into place;
13.Remove the three screws of the upper middle
hinge (M);
14.Remove the fridge door by releasing it from the
top hinge pin (G).
15.Remove the upper door by sliding it off the upper
pin (A); remove the door hole cap for the hinge
pin and mount it on the other side:
16.Unscrew the upper pin (A) and mount it on the
other side;
G
F
D
PR18
F
F
F
E
E
3P004
N
P
M
L I
Rear spacers
In the bag with the documentation, there are two
spacers which must be fitted as shown in the figure.
Slacken the screws and insert the spacer under the
screw head, then re-tighten the screws.
D594


