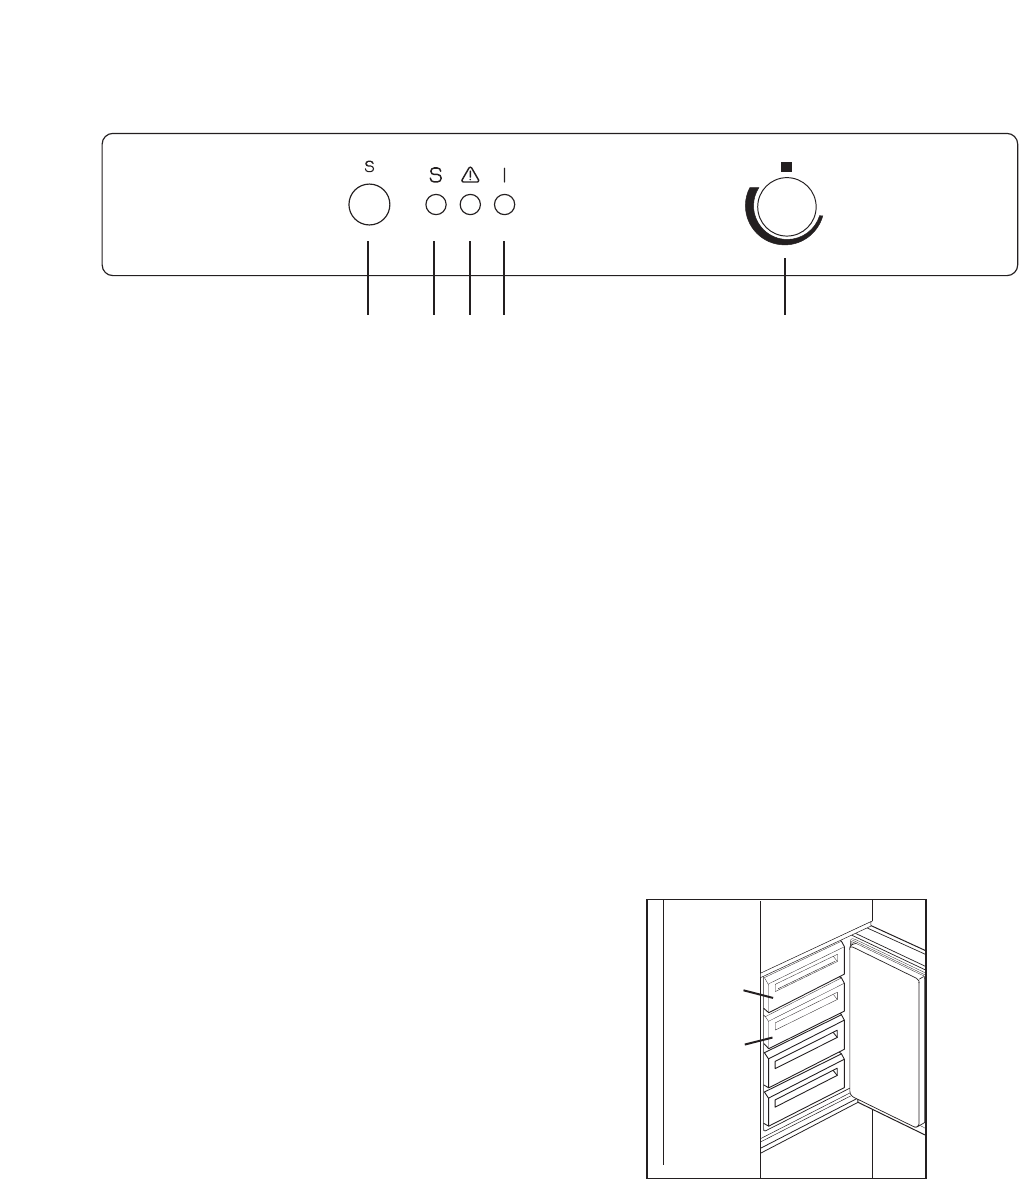
OPERATION
ABCD
E
min
MAX
A - Fast-freeze switch push button
B - Fast-freeze indicator light (Amber)
C - Alarm indicator light (Red)
D - Operation light (Green)
E - Thermostat control knob
Before using
Remove all securing tapes. Wash inside the
appliance with lukewarm water and bicarbonate of
soda (5 ml to 0.5 litre of water).
Do not use soap or detergent as the smell may
linger. Dry thoroughly.
Starting your appliance
Insert the plug into the wall socket. The pilot light (D)
will light up to show that the appliance is on.
However, the alarm indicator light (C) will also light
up until the freezer reaches the correct temperature.
Temperature control
The temperature within the freezer is controlled by
the thermostat situated at the top of the cabinet (E).
To operate the freezer proceed as follows:
Turn the thermostat control knob the Ç■È position.
When you first start the freezer, we suggest that you
turn the thermostat control knob to a medium setting.
For easier turning of this control, use a small coin.
The internal temperature of the freezer is
automatically adjusted by the thermostat to ensure
safe food storage.
However, if the appliance is working in unfavourable
room conditions such as poor ventilation, high
temperature and frequent door openings, it may be
necessary to select a more suitable setting. To
obtain a lower temperature, turn the thermostat
control knob towards maximum; to obtain a higher
temperature turn the control knob towards minimum.
In any 24 hour period you can freeze up to 16 kg of
fresh food.
When you first start the freezer or after a period of
non-use, press the fast-freeze switch (A) 2-3 hours
before you want to freeze your food (the yellow light
(B) illuminates).
If the freezer is already in operation, the fast-freeze
switch should be activated about 24 hours before
freezing fresh food. This time can be shortened,
depending on the quantity of food to be frozen. After
the time has elapsed place the food to be frozen in
the top compartments of the freezer as this is the
coldest part as shown in the diagram.
Once the food is completely frozen (which could take
up to 24 hours) press the fast freeze switch; the
yellow light (B) goes off.
Distribute the frozen food packages in the other
compartments, so that the top compartment can be
used for a further freezing operation.
The food to be frozen must be fresh and of the best
quality.
Do not allow fresh food to touch food which is
already frozen.
During the freezing process, ensure that the freezer
door remains closed.
5
D670
9 Kg
7 Kg
20
PR33
C
A
Fix cover (C) on guide (A) until it clips into place.
Open the appliance door and the furniture door at
90¡. Insert the small square (B) into guide (A). Put
together the appliance door and the furniture door
and mark the holes as indicated in the figure.
Remove the squares and drill holes with ¿ 2 mm at
8 mm from the outer edge of the door. Place the
small square on the guide again and fix it with the
screws supplied.
8mm
PR167
A
B
PR168
PR167/1
D
B
Should adjustment of the furniture door be
necessary, use the clearance of slots as required.
At the end of operations, it is necessary to check if
the door of the furniture closes properly.
Fix cover (D) on guide (B) until it clips into place.
After completion of the door reversing operation,
check that the door gasket adheres to the
cabinet. If the ambient temperature is cold (i.e. in
Winter), the gasket may not fit perfectly to the
cabinet. In that case, wait for the natural fitting of
the gasket or accelerate this process by heating
up the part involved with a normal hairdryer on a
low setting.


