


11
D037
Defrosting
Refrigerator
Frost is automatically eliminated
during normal use. The defrost water
drains out through a trough into a
special container at the back of the
appliance, where it evaporates.
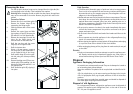
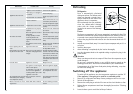
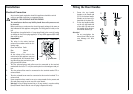
We recommend that you peridically
clean the defrost-water drainage
outlet with the cleaner provided,
located in the center of the drainage
groove.
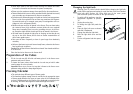
Freezer
The freezer compartment, will become progrssively covered with frost. This
should be removed with a plastic scraper. Whenever the tickness of the fro-
st exceeds 4 mm complete defrosting should be carried out as follows:
1. pull out the plug from the wall socket or turn the thermostat knob to th “0”
setting.
2. remove any stored food, wrap it in several layers newspaper and put it in a
coll place.
3. leave the door open.
4. when defrosting is completed, dry the interior thoroughly
5. turn the thermostat knob to the required setting or raplace the plug in the
power socket.
Attention
Never use sharp metal tools to scrape off frost from the evaporator as you
could damage it.
Do not use a mechanical device or any artificial means to speed up the
thawing process other than those recommended by the manufacturer.
A temperature rise of the frozen food packs, during defrosting , may shor-
ten their safe storage life.
Switching off the appliance
To switch off the appliance, turn the temperature regulator to position "0".
If the appliance is not going to be used for an extended period:
1. Remove all refrigerated and deep-frozen packages as well as ice trays.
2. Switch off the appliance .
3. Remove the mains plug or switch off or turn out the circuit breaker or fuse.
4. Defrost freezer compartment and clean thoroughly (see section: “Cleaning
and Care”).
5. Leave the door open to avoid the build up of odours.
14
Interior lighting does not
work.
Light bulb is defective. Please look in the "Changing
the Light Bulb" section.
Heavy build up of frost, possi-
bly also on the door seal.
Door seal is not air tight (pos-
sibly after changing over the
hinges).
Carefully warm the leaking
sections of the door seal with
a hair dryer (not hotter than
approx. 50 °C). At the same
time shape the warmed door
seal by hand such that it sits
correctly.
Unusual noises.
The appliance is touching the
wall or other objects.
Appliance is not level.
A component, e.g. a pipe, on
the rear of the appliance is
touching another part of the
appliance or the wall.
The compressor starts after a
period of time.
This is normal, no error has
occurred.
The compressor does not start
immediately after changing
the temperature setting.
If necessary, carefully bend
the component out of the
way.
Move the appliance slightly.
Readjust the feet.
See the "Cleaning and Care"
section.
Water on the floor or on sto-
rage shelves.
Water drain hole is blocked.
Malfunction Possible Cause Remedy
The food is too warm.
The appliance is near a heat
source.
Temperature is not properly
adjusted.
Please look in the "Initial Start
Up" section.
Turn the temperature regula-
tor to a colder setting tempo-
rarily.
Door was open for an exten-
ded period.
Please look in the "Installation
location" section.
A large quantity of warm
food was placed in the
appliance within the last 24
hours.
Open the door only as long as
necessary.
Appliance does not work.
Appliance is not switched on Switch on the appliance.
Mains plug is not plugged in
or is loose.
Insert mains plug.
Fuse has blown or is defective.
Check fuse, replace if neces-
sary.
Socket is defective.
Mains malfunctions are to be
corrected by an electrician.
Appliance cools too much. Temperature is set too cold.
Turn the temperature regula-
tor to a warmer setting tem-
porarily.