


3
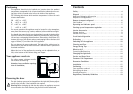
Contents
Safety . . . . . . . . . . . . . . . . . . . . . . . . . . . . . . . . . . . . . . . . . . . . . . . . . .4
Disposal . . . . . . . . . . . . . . . . . . . . . . . . . . . . . . . . . . . . . . . . . . . . . . . .5
Appliance Packaging Information . . . . . . . . . . . . . . . . . . . . . . . . . . . . . . .5
Disposal of old Appliances . . . . . . . . . . . . . . . . . . . . . . . . . . . . . . . . . . . . .6
Remove transport safeguard . . . . . . . . . . . . . . . . . . . . . . . . . . . . . . . .6
Shelf holders . . . . . . . . . . . . . . . . . . . . . . . . . . . . . . . . . . . . . . . . . . . . . . . .6
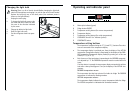
Operating and indicator panel . . . . . . . . . . . . . . . . . . . . . . . . . . . . . .7
Starting up and temperature regulation . . . . . . . . . . . . . . . . . . . . . .8
Interior Accessories . . . . . . . . . . . . . . . . . . . . . . . . . . . . . . . . . . . . . . .9
Storage shelves . . . . . . . . . . . . . . . . . . . . . . . . . . . . . . . . . . . . . . . . . . . . . .9
Variable Inner Door . . . . . . . . . . . . . . . . . . . . . . . . . . . . . . . . . . . . . . . . . . .9
Fresh food refrigeration . . . . . . . . . . . . . . . . . . . . . . . . . . . . . . . . . .10
Defrosting . . . . . . . . . . . . . . . . . . . . . . . . . . . . . . . . . . . . . . . . . . . . .10
Switching off the appliance . . . . . . . . . . . . . . . . . . . . . . . . . . . . . . .10
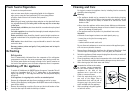
Cleaning and Care . . . . . . . . . . . . . . . . . . . . . . . . . . . . . . . . . . . . . . 11
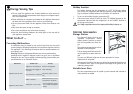
Energy Saving Tips . . . . . . . . . . . . . . . . . . . . . . . . . . . . . . . . . . . . . . .12
What to do if . . . . . . . . . . . . . . . . . . . . . . . . . . . . . . . . . . . . . . . . . . .12
Correcting Malfunctions . . . . . . . . . . . . . . . . . . . . . . . . . . . . . . . . . . . . .12
Changing the light bulb . . . . . . . . . . . . . . . . . . . . . . . . . . . . . . . . . .14
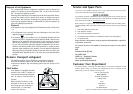
Service and Spare Parts . . . . . . . . . . . . . . . . . . . . . . . . . . . . . . . . . . .15
Customer Care Department . . . . . . . . . . . . . . . . . . . . . . . . . . . . . . .15
Guarantee Conditions . . . . . . . . . . . . . . . . . . . . . . . . . . . . . . . . . . . .16
Installation . . . . . . . . . . . . . . . . . . . . . . . . . . . . . . . . . . . . . . . . . . . . .17
Positioning . . . . . . . . . . . . . . . . . . . . . . . . . . . . . . . . . . . . . . . . . . . . .18
Your appliance needs air . . . . . . . . . . . . . . . . . . . . . . . . . . . . . . . . . . . . .18
Rehingeing the door . . . . . . . . . . . . . . . . . . . . . . . . . . . . . . . . . . . . . . . . .18
Housing dimension . . . . . . . . . . . . . . . . . . . . . . . . . . . . . . . . . . . . . . . . . .19
Regulations, Standards, Guidelines . . . . . . . . . . . . . . . . . . . . . . . . .19
18
Positioning
This appliance should only be installed at a location where the ambient
temperature corresponds to the climate classification indicated on the rat-
ing plate, which is located at the left on the inside of the appliance.
The following table shows which ambient temperature is correct for each
climate classification:
SN +10°C to + 32°C
N +16°C to + 32°C
ST +18°C to + 38°C
T +18°C to + 43°C
For correct operation this appliance must be located in a dry atmosphere,
away from heat sources, e.g. cookers, radiators, boilers and direct sunlight.
You should also ensure that air can circulate freely around the back and the
top of the cabinet. There should be 100mm (4”) between the top of the cab-
inet and any overhanging kitchenfurniture. Alternatively allow 50mm (2”)
between the top of the cabinet and any overhanging kitchen furniture and
a gap of 25mm (1”) on either side of the appliance.
Do not obstruct the space underneath. The back of the cabinet may be
placed close to the wall but must not touch it. DO NOT install in places with
restricted ventilation.
Adjust the level of the appliance by screwing out the adjustable foot, or
feet, at the bottom of the cabinet using your fingers.
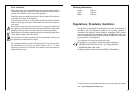
Your appliance needs air
For safety reasons, minimum ventila-
tion must be as shown Fig.
Attention: keep ventilation openings
clear of obstruction;
50 mm
min.
200 cm
2
200 cm
2
min.
D567
Reversing the door
The side the door opens can be changed from the right side (factory adjust-
ment) to the left side, if the installation site requires.
Warning! When changing the side the door opens, the appliance must not
be connected to the mains. Remove plug from the mains beforehand.