


WARNING: After every use, turn unit off, unplug unit and press steam delivery button until all pressure has been
released before removing safety cap.
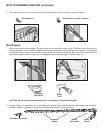
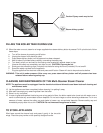
1.Unscrew the safety cap. (After each use, turn the appliance over in order to completely empty
the boiler.)
2. Fill the measuring cup with water to the marked water line, twice. Use the funnel to pour the
water into the boiler. The boiler takes two measuring cups of water at a time. Do not overfill.
NOTE: Never put descaling, aromatic, alcoholic or detergent products into the appliance, as this may damage it or
make it unsafe for use.
3. Screw the cap back onto the appliance.
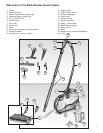
Attachments
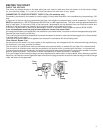
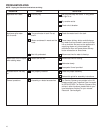
4. Insert the straight nozzle and push it onto the fixed section of the spray nozzle. Align
the straight nozzle groove with the line on the spray nozzle, then rotate the straight
nozzle 90° (clockwise) in the direction of the arrow until it locks into place.
5.Insert the elbow inside the hole of the floor nozzle, paying attention to line up the reference symbols on the elbow and on
the floor nozzle as shown in the picture.
Press the elbow up to run, turn of 90° and connect the whole item to the wand hose.
HOW TO ASSEMBLE AND USE
6
INSTRUCTIONS FOR USE
The Electrolux Multi-Steamer steam cleaner is designed to thoroughly clean hard surfaces and upholstery that will withstand
high heat. Do not use on soft plastics, unsealed wood, and cold glass. Check with the manufacturer of all upholstery types
that the fabric can be steam cleaned. Particular care should be taken with velour and draylon fabrics.
WARNING:On surfaces that have been treated with wax or some no wax floors, the sheen may be removed by the
heat and steam action. Do not use on unsealed wood. This could cause the woodgrain to rise.
It is therefore recommended that a sample cleansing be carried out on an isolated area of the surface to
be cleaned. Also, check use and care instructions from the manufacturer on the object you want to
clean.
Do not plug unit into an electrical outlet until Step 10.
Straight Nozzle