


Operating Instructions OPERATING INSTRUCTIONS
9. To add ingredients after the
freezing process has started,
slowly add them through the feeder
hole.
10. To avoid overheating the motor,
the direction of the rotation will
change when the mixture becomes
too thick. If the direction of the
rotation continues to change, the
mixture is completely prepared.
Turn the unit off.
11. Remove the cover with the paddle
from the ice cream mixture. Use
only rubber, plastic or wooden
utensil to serve or remove from the
freezer canister. Metal utensils
may damage the freezer canister.
12. To further harden the ice cream,
you may place the freezer canister
in the freezer for a short period of
time (no longer than thirty minutes).
For longer freezing time. You
should empty the ice cream in an
airtight container.
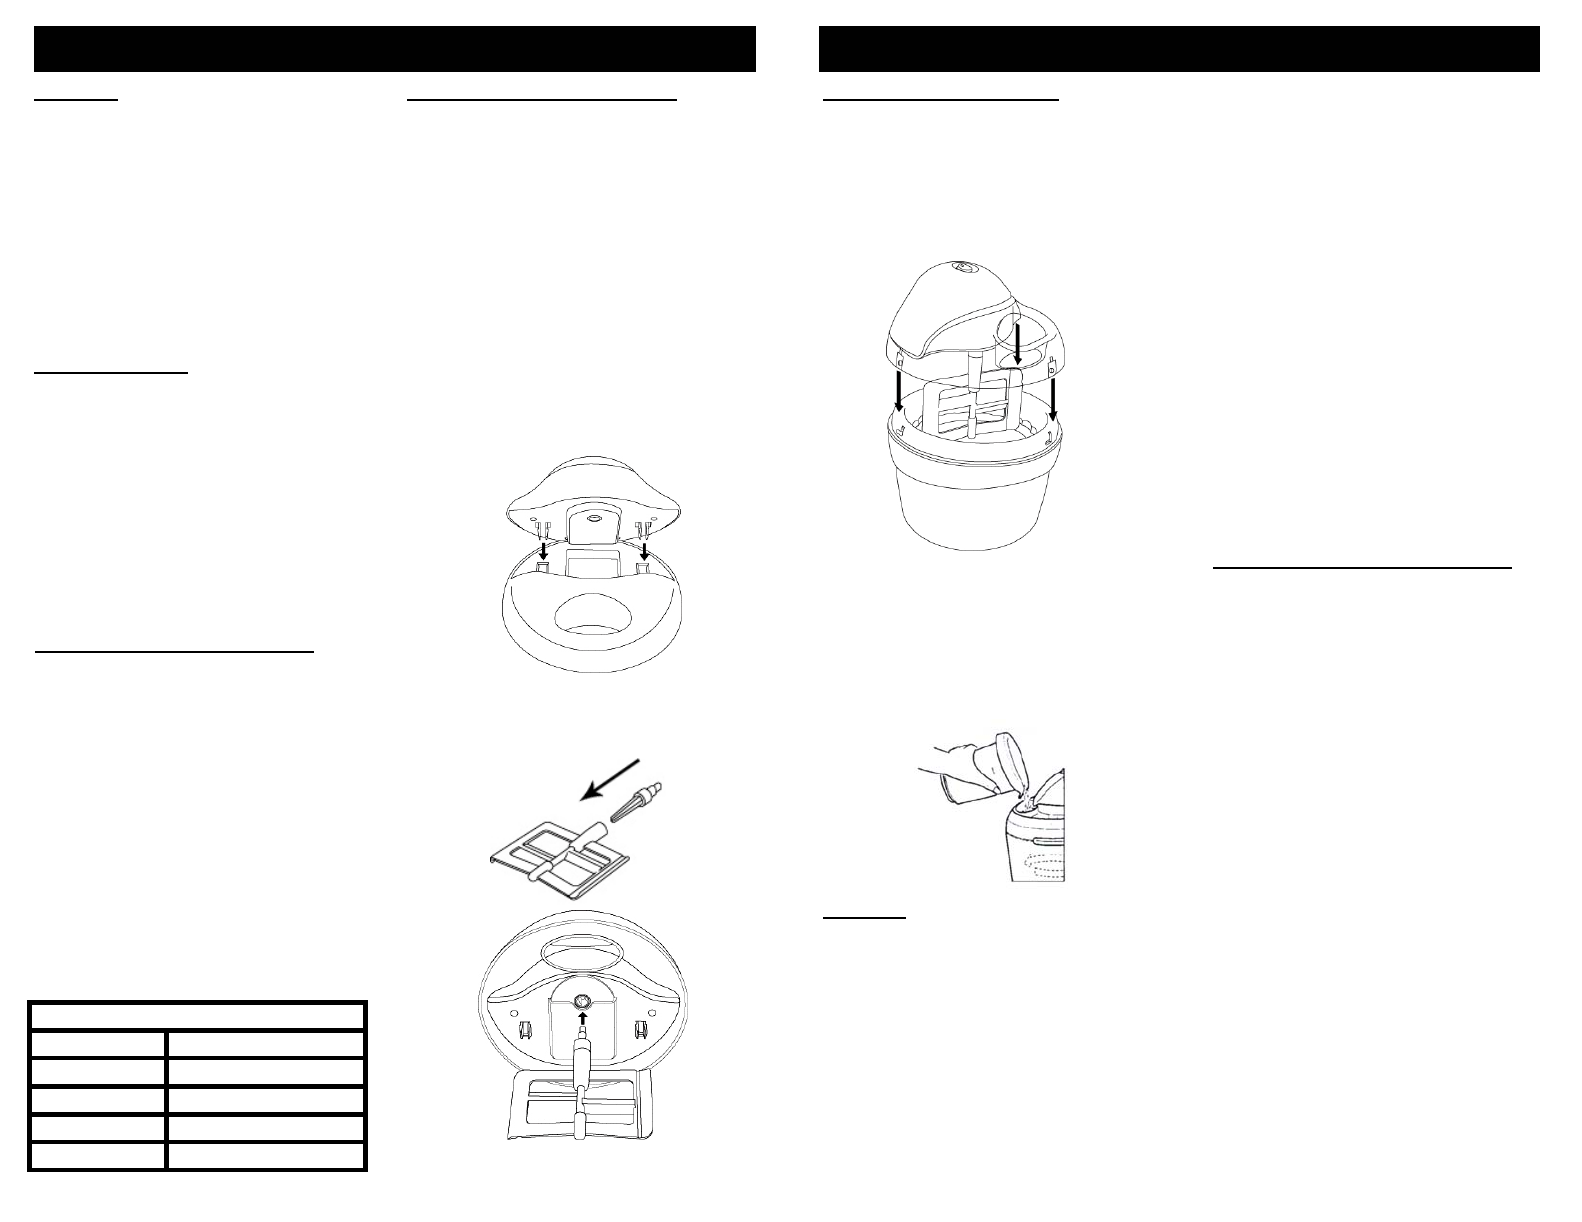
Features Using Your Ice Cream Maker Making Ice Cream (cont.)
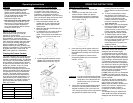
4. Remove the freezer canister from the
freezer.
5. Place drive unit with the cover on the
freezer canister. Make sure that all
the locking tabs are aligned. Rotate the
cover clockwise slightly so that the tabs
lock in place. (Fig. 4)
Your ice cream maker can make up to 1
1/2 quarts of ice cream. Due to an
increase in volume when freezing the
ingredients, you should not exceed 1
quart of liquid ingredients. If you are using
your own recipes, adapt the volume of the
mixture not to exceed this amount.
1. Place the freezer canister into the
coldest part of your freezer the day
before. See chart for approximate
freezing time.
2. Make sure that the On/Off button is in
the "Off" position.
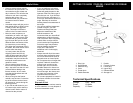
3. To assemble the unit, insert the drive
unit into the cover until it locks in
place. The two tabs on the bottom of
the drive unit will lock into the cover.
(Fig. 1)
Fig. 1
• Double insulated freezer canister.
Double insulated walls keep the
freezer canister colder for longer
periods and for better freezing results.
The gel inside these double walls
provides thorough and even
freezing throughout use.
• See through cover with feeder hole.
The see through cover allows you to
keep an eye on the freezing process.
The convenient feeder hole allows
you to add ingredients without having
to stop the unit to do so.
Remove all packing materials and
manuals form inside your new gel
canister ice cream maker.
Wash each part of the unit which touches
the ingredients, such as the Stirring
Paddle, Lid, and the Ice Cream bucket.
Parts should be washed with warm water
and a mild dish washing detergent and
wiped completely dry. Do NOT use
abrasive cleaners to clean as these may
damage your appliance. Power head may
be wiped clean with a damp cloth. Do
NOT clean appliance in dishwasher.
Before First Use
Fig. 4
Cleaning Your Ice Cream Maker
The freezer canister may be washed in
warm water with a mild dishwashing
detergent then dried thoroughly.
To separate the freezer canister from
the upper and lower rings for washing,
press on the release button and lift the
upper ring first. Then remove the lower
ring by sliding it off the freezer canister.
To replace the upper and lower rings
after the freezer canister is completely
dry, slide on the lower ring first aligning
the hole for the release button with the
arrow on the freezer canister. Then
insert the upper ring making sure that
the two rings snap together.
Do NOT wash any part in a dishwasher.
Do NOT use sharp utensils, scouring
pads or abrasive cleansers to clean the
freezer canister.
The drive unit may be cleaned with a
damp cloth. Never immerse the drive
unit in water or any other liquid.
Never place the freezer canister in the
freezer if it is still wet. Always make
sure that the freezer canister is
completely dry before placing in the
freezer.
The storage lid may be washed with
warm water and a mild dishwashing
detergent then dried thoroughly.
6. Insert the plug into the power outlet and
start the unit right away. This will prevent
the paddle from freezing onto the freezer
canister.
7. Pour the prepared ice cream mixture
through the feeder hole into the freezer
canister. (Fig. 5)
Fig. 5
Important: It is very important that the freezer
canister be used immediately after
being taken out of the freezer as it
starts to thaw once it is removed
from the freezer.
8. Leave the unit on for approximately 20-40
minutes or until the mixture reaches the
desired consistency. Do not turn the unit
"Off" during use as the mixture may freeze
and prevent the paddle from turning.
Freezing the Freezer Canister
3
FREEZING GUIDE
FREEZER TEMP APPROX. FREEZING TIME
-22° F / -30° C 8-9 Hours
-13° F / -25° C 12-13 Hours
0° F / -18° C 20-22 Hours
5° F / -15° C 24 Hours or more
3. Insert the paddle extender into the
paddle (Fig.2) and then insert the
paddle into the drive unit. (Fig. 3)
Fig. 2
Fig. 3
The most important step in making frozen
desserts, is making sure that the freezer
canister is completely frozen. The Bravetti
Gel Canister Ice Cream Maker features a
double walled insulated freezer canister
for perfect frozen desserts every time. To
freeze your canister, wrap it in a large
resealable freezer bag and place it
upright in the coldest part of your freezer.
Using a resealable freezer bag prevents
ice crystals from forming on the freezer
canister. The length of time to properly
freeze the freezer canister depends on
how cold your freezer temperature is. To
make sure that your freezer canister is
properly frozen, you should not hear any
gel moving within the freezer canister
when you shake it.
4