


BEFORE USING YOUR
TRIPLE GEL ICE CREAM MAKER
Features
• 3 Small Freezer Canisters
6 oz (200 ml) capacity each. To make 3 different flavors at the same time.
• Double Insulated Freezer Canister
Double insulated walls keep the freezer canisters colder for longer periods and for
better freezing results. The gel inside these double walls provides thorough and even
freezing throughout use.
• See Through Cover With Feeder Hole
The see through cover allows you to keep an eye on the freezing process. The
convenient feeder hole allows you to add ingredients without having to stop the unit
to do so.
Before First Use
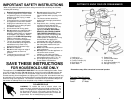
Remove all packing materials and manual from inside your ice cream maker. Do
NOT immerse the motor base in water or other liquids. The freezer canisters, ice
cream paddles and locking lid are not dishwasher safe. Parts should be washed
with warm water and a mild dish washing detergent and wiped completely dry. Do
NOT use abrasive cleaners to clean as these may damage your appliance. The
drive spline may be wiped clean with a damp cloth.
Freezing the Freezer Canister
The most important step in making frozen desserts, is making sure that the freezer
canisters are completely frozen. The triple chill ice cream maker features double
walled insulated freezer canisters for perfect frozen desserts every time. To freeze the
freezer canisters, wrap them in a large re-sealable freezer bags and place them
upright in the coldest part of your freezer. Using re-sealable freezer bags prevents ice
crystals from forming on the freezer canisters. The length of time to properly freeze
the freezer canisters depends on how cold your freezer temperature is. To make sure
that your freezer canisters are properly frozen, you should not hear any gel moving
within the freezer canisters when you shake them.
FREEZING GUIDE
FREEZER TEMP APPROX. FREEZING TIME
-22° F / -30° C 8-9 Hours
-13° F / -25° C 12-13 Hours
0° F / -18° C 20-22 Hours
5° F / -15° C 24 Hours or more
3 4
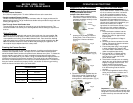
Assembling the Ice Cream Maker
NOTE: Do not plug the power cord
into an electrical outlet until the unit
is fully assembled and freezer
canisters have been frozen.
1. Place the freezer canisters on the
motor base. Ensure that the freezer
canisters are sitting correctly on the
drive boss. (Fig 1)
2. To place the locking lid, fit the
opening of the locking lid onto the
locking knob. This will also form a
lid over the 3 freezer canisters.
(Fig. 2)
3. To lock, turn the locking knob clock-
wise 90° to the lock position. (Fig. 3)
OPERATING INSTRUCTIONS
Freezer
Canister
Drive Boss
Fig. 1
Fig. 2
Fig. 3
Locking
Knob
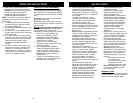
Ice Cream
Paddle
Filling
Hole
4. Place the ice cream paddles into the
filling holes, turning clockwise 90° to
lock into place. The paddle will stop
turning when in locked position. (Fig. 4)
Fig. 4
Fig. 5
Pour liquid
in filling hole
Using Your Ice Cream Maker
Your ice cream maker can yield 6 oz (200
ml) for each canister. A total of 18 oz (600
ml) of ice cream at one time. It is best to
mix all the ingredients together into an
easy pour container and chill for 2 hours
before taking the freezer canisters out of
the freezer and assembling the unit to
make the ice cream. Due to an increase in
volume when freezing the ingredients, you
should not exceed 6 oz. of liquid
ingredients in each freezer canister. If you
are using you own recipes, adapt the
volume of the mixture not to exceed this
amount.
1. Place the freezer canisters into the
coldest part of your freezer the day
before. See chart for approximate
freezing time.
2. Chill mixed ingredients in fridge or
freezer.
3. Remove the freezer canisters from the
freezer. (Remove the freezer canisters
from their freezer bags.)
4. Ensure that power plug is not plugged
in when assembling or cleaning the
ice cream maker. Assemble ice cream
maker as explained previously.
5. Ensure that lid is in locked position.
Plug the unit into a 120V outlet. To
turn the unit on, push the On/Off
power button down.
6. If the freezer canisters are not rotating,
gently turn one of the freezer canisters
slightly to engage the drive boss. The
freezer canister should now be
rotating. This will prevent the paddle
from the freezing onto the freezer
canister.
7. Pour chilled ingredients into the filling
holes until the freezer canisters are ¾
full. (Fig. 5)
Important: It is very important that the
freezer canister are used immediately after
being taken out of the freezer as they start
to thaw once they are removed from the
freezer.