


Read all the sections of this booklet and follow all the instructions carefully.
Before Using Your Toaster Oven with
Rotisserie & Griddle
Before using your Toaster Oven with Rotisserie & Griddle for the first time, be
sure to:
1. Read all of the instructions included in this manual.
2. Make sure that the oven is unplugged and the Time Control (D) is in the
“OFF” position.
3. Wash the racks (M), drip pan (N), broiler rack (O) and crumb tray (L).
in hot, soapy water or in the dishwasher. Also remove the rotisserie
skewer (P), and skewer clamps (Q) from the packaging and wash these
in hot, soapy water.
4. Thoroughly dry all accessories and re-assemble in oven. Plug oven into
outlet and you are ready to use your new Toaster Oven with Rotisserie &
Griddle .
5. After re-assembling your oven, we recommend that you run it at the
highest temperature (450° F.) on the Toast Function for approximately 15
minutes to eliminate any packing residue that may remain after shipping.
This will also remove all traces of odor initially present.
Please Note: Initial start-up operation may result in minimal smell and
smoke (about 15 minutes). This is normal and harmless.
It is due to burning of the protective substance applied to
the heating elements in the factory.
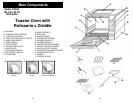
Using Your Toaster Oven with Rotisserie & Griddle
Please familiarize yourself with the following oven functions and accessories
prior to first use:
• Temperature Control (B) - Choose the desired temperature from Keep
Warm to 450° F for baking or rotisserie.
• Function Control (C) - This oven is equipped with five positions for a
variety of cooking needs:
Bake/Roast - Cakes, pies, cookies, poultry, beef, pork, etc.
Toast - Bread, muffins, frozen waffles, etc.
Rotisserie - Can cook up to a 5-lb. roast or chicken
Griddle/Broil - For broiling fish, steak, poultry, pork chops, etc. and for
making grilled cheese sandwiches, eggs, bacon, etc.
Keep Warm - To keep cooked food warm for up to 30 minutes.
• Time Control (D) - When you turn the control to the left, (counter-clockwise),
the oven will stay “ON” until it is manually shut “OFF”. To activate the timer
segment of the control, turn to the right (clockwise) to toast or use as a timer.
This function also has a bell that rings at the end of the programmed time.
5 6
• On-Light Indicator (H) - It is illuminated whenever the oven is turned on.
• 2 Bake Racks (M)- For toasting, baking and general cooking for
casserole dishes and standard pans.
• Drip Pan and Broiler Rack (N & O) - For use in broiling and roasting
meat, poultry, fish and various other foods. The broiler rack (O) allows
the fat drippings to drip into the drip pan (N) and away from the food.
This will help prevent spattering that could result in smoke and flare
ups.
• Tray/Rack Handle (J) - Allows you to pick up the bake rack (M), drip
pan (N) and broiler rack (O) when they are hot.
• Rotisserie Skewer (P) - Roasts a variety of meats and poultry that are
very tender and juicy inside, and browned to perfection outside.
• Rotisserie Handle (K) - Used for removing the rotisserie skewer from
the oven after your roast is done.
Caution: Always use extreme care when
removing rotisserie, broiler
rack, drip pan, bake racks,
crumb tray or any hot container
from a hot oven. Always use
the tray/rack handle, rotisserie
handle or an oven mitt when
removing these items.
Using Your Toaster Oven with Rotisserie & Griddle
cont..
WARNING: TO AVOID RISK OF INJURY
OR BURNS, DO NOT
TOUCH HOT SURFACES
WHEN OVEN IS IN USE.
ALWAYS USE OVEN MITTS.