


4
* The appliance is not intended for use by young children
or infirm persons without supervision. Young children
should be supervised to ensure they do not play with the
appliance.
* The cooktop surface and the inferior part of the range
hood must be at a minimun distance of 65 cm.
* The air sucked can't be vented through or into a duct
used to let out fumes from appliances fed by energy other
than electric power (eg. centralizedheating, radiators,
water-heaters, etc.).
* To evacuate the air outlet, please comply with the
pertaining rules given by competent authorities.
* Flambe cooking is prohibited underneath the range
hood.
*Ensure the room has adequate aeration when a range hood
and appliances fed by energy other than electric power (gas-,
oil-, or coal- stoves, etc.) are used simultaneously. The range
hood, when evacuating the sucked air, could generate a
negative pressure in the room- which can't exceed the limit of
0.04 mbar, in order to avoid the suck of exhausts deriving
from theheat-source. Therefore the room should have air-
intakes to allow a costant flow of fresh air.
If the rating lable in the range hood shows
the symbol ,
the appliance is built in class II° and it does not need
any
earth connection.
If the rating lable in the range hood does not show
the
symbol
, the appliance is built in class I° and it needs
an earth connection.
* When performing the electrical connections on the
appliance, please make sure that the current-tap is provided
with earth connection and that voltage values correspond to
those indicated on the label placed inside the appliance itself.
* Before carrying out any cleaning or maintenance operations,
the appliance needs to be removed from the electric grid. If
the appliance is not supplied with a non-separable flexible
cable and plug, or with another device ensuring omnipolar
disconnections from the grid, with an opening distance
between the contacts of at least 3 mm, then such
disconnecting devices must be supplied within the fixed
installation. If the fixed appliance is supplied with a supply
cord and a plug, the appliance has to be put in a place where
the plug can be reached easily.
* The use of materials which can burst into flames should
be avoided in close proximity of the appliance. When
frying, please pay particular attention to fire risk due to oil
grease. Since it is highly inflammable, fried oil is
especially dangerous. Do not use uncovered electric
grills In order to avoid possible fire risk, all instructions
for grease filter cleaning and for removing eventual
grease deposits should be strictly followed.
WARNINGS
USES
The appliance is already arranged both for filtering and for
suction performances.
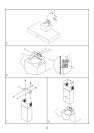
* In its filtering version (Fig.1), the air and fumes vented by
the appliance are depured both by a grease filter and by an
active coal filter, and put again into circulation through the
side-grids of the chimney. For this version an air deflector
placed on the superior part of the pipe and allowing air-
recycling is necessary (Fig.1A).
* In its sucking version (Fig.2), fumes are directly vented
outside, through an evacuation duct connected with the
superior part of the wall or the ceiling. Both coal filter and air
deflector are not necessary in this case.
INSTALLATION
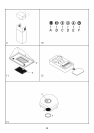
* Before installing the appliance and in order not to damage
the appliance itself, the metal grease filter should be removed.
Such filter can be removed by pushing the special filter handle
toward the back side of the range hood and turning it
downwards so as to unfasten it from its slot (Fig.3B).
Wall stirrup-fixing
* Using the special drilling jig (Fig.4X), perforate the wall
according to the pattern indicated by the jig itself, and pay
attention in order not to damage water pipes and electric
wires. Perforation should be performed with a Ø 8 mm wall-
drill. Then insert the proper plastic reinforcements (Fig.4A).
The hood-bearing stirrup (Fig.4S) can be applied by using the
screws provided with the equipment (Fig.4B). Now hook the
range hood onto its bearing (Fig.5) and then adjust
horizontally and vertically the position of the appliance by
adjusting the special metric screws (Fig.6V,T).
After the appliance is adjusted, fix it by inserting and
tightening the safety screws properly (Fig.4C)