


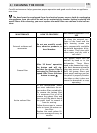


18
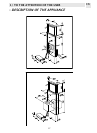
2/ INSTALLING THE HOOD
EN
1) Before installing the appliance, make sure that none of the parts is damaged in any way. In case of
damaged parts, contact your retailer and do not proceed with installation.
Read all of the following instructions with care before installing the appliance.
- Use an air outlet pipe of the shortest possible length.
- Limit the number of pipe bends.
- Use a material approved by standards and regulations.
- Avoid any sudden changes in pipe section (recommended constant diameter: 150 mm or equal
surface area).
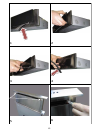
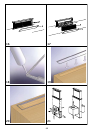
Before the installation of the Downdraft, please remove the security piece you can see in the picture
(Fig. 1-2-3-4).
The manufacturer will not be answerable for any capacity or noise problems caused by failure to com-
ply with the above instructions and the warranty will be rendered null and void.
2) Before making the opening, check that there are no structural or other parts inside the cabinet, where
the appliance is to be placed, which could hinder a proper installation. Check that the dimensions of
the Downdraft and the ones of the cooktop are compatible with the cabinet so that the installation can
be carried out properly.
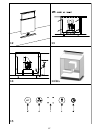
3) Make a rectangular opening measuring 490 x 104 mm in the area chosen for the cook top.
For models with motor already fitted, remove the screws and the extraction unit to fit the downdraft in
the relevant hole. At this point, insert a seal (silicone) in the bottom section of the frame support (Fig.
18) and place in the relevant hole (Fig. 19-20), then proceed to insert the downdraft into the unit.
4) Put the Downdraft in the opening, inserting it from above as shown in Fig. 12.
5) The upper edge of the Downdraft must fit perfectly the cooktop.
6) Fix the Downdraft inside the cabinet. According to the dimensions of the cabinet and of the air outlet
duct, use the provided fixing brackets.
Attention: do not make any additional openings on the appliance in order to avoid to damage the
internal sliding and electrical components.
7) After completing the installation and connecting the appliance to the mains electricity, lift the down-
draft and remove the door block (Fig. 5-6-7). Then open the door (Fig. 8 - 9), remove the PVC grease
filter shield (Fig. 10), then place the filters as illustrated in Fig. 11
8) In the version of the Downdraft equipped with motor, install the motor group adjusting the air evacu-
ation direction as required, either downwards or upwards. After installing the motor, connect the air
ducts (Fig. 13).The motor can be fitted either on the front or back side of the downdraft..
9) For versions with outside motor, place the suction unit (outside motor) in a suitable area and fit the
exhaust air flue as illustrated in Fig. 13. Proceed to fit the air outlet ducts between the outside mo-
tor and the down draft. Select an air outlet from the five possibilities (Fig. 21) and fit the connection
provided.
10) Put the metallic box containing the electronic components in a place easy to be reached if a technical
assistance is needed Fig. 14). Connect the electrical connectors of the box to the Downdraft (Fig. 14).
11) For outside motors, connect the motor unit cable to the relevant connector on the electrical compo-
nents box.
12) Power the appliance.
Downdraft calibration
After the downdraft has been installed, the aspiration panel must be calibrated. This operation is neces-
sary to regulate the power exstraction of the aspiration panel. Connect the product to the power line,
making sure that it is conformed to the supply voltage indicated on the technical data tag. Pushing
the ON/1 button (Fig. 22B for SDD3 and 15H for SDD3 TC) the aspiration panel rises. After it has reached
a height of 180mm from the cooketop, press OFF, to stop the extraction then the Timer and after 2 sec.
the OFF button.
The downdraft will carry out the calibration of its aspiration panel rising and retracting for some centim-
eters. During this phase, the buttons on the pushbutton control panel blink. At the end of the calibration,
the aspiration panel get back to the previous position and the button end to blink. Wait until the aspiration
panel stops moving before re-activating the extraction.
After the self-calibration stage, close the filter unit completely using the OFF button.