


To Winterize the Unit
If you plan to be away from home for
extended periods, or the filter housing
may be subject to the risk of freezing,
the following procedure must be carried
out:
1 Shut-off the mains water supply. A
stop valve was supplied with the
system for this purpose, and will be
found located on the adjacent
pipework.
2 Turn the Pure valve on the faucet to
the ON position. This will confirm
that the water supply is turned off,
and release the pressure in the
system.
3 Conveniently position a suitable
receptacle to catch residual water
from the housing. Lift the filter unit
from its retaining bracket. Holding
Cap ‘B’ press down on the safety
clip and unscrew Housing ‘A’ a
quarter turn in the direction of the
arrow shown. Slide housing off of
filter cartridge and place to one side.
4 Wash housing ‘A’ in warm soapy
water, then rinse well.
5 Fit Cap ‘B’ and Housing ‘A’ back
together and turn a quarter turn in
the opposite direction of the arrow
shown to lock.
6 When the risk of freezing subsides
and you wish to use the system
again, open the mains supply to the
filter. Run the filtered water for 2
minutes to flush the system and
c
heck carefully for leaks. The system
should now be ready for use.
Allowing the unit to freeze will
invalidate the product warranty.
Oper
ation
A unique feature of the Franke Triflow is
the thr
ee oper
atin
g
v
alv
e
s
– one each
t
o c
ontr
o
l
the flow of hot, cold and
filtered water. Each handle is marked:
hot, cold and pure. The flow from full-off
to full-on is adjusted by simply rotating
the handles a quarter turn – forward for
hot
and c
o
ld, to the left for filtered
water.
Important: Each time the filtered water
is turned on, allow it to run for a few
moments to expel the small amount of
residual water in the pipework between
the filter and the faucet.
The Triflow Faucet
Cleaning –
The Franke Triflow 3 way
faucet itself requires little routine
maintenance beyond the occasional
cleaning of the plated finish with a soft
cloth and warm soapy water, followed
by a polish with a soft cloth.
Do not
under any circumstances use abrasive
liquids, powders, or scouring pads to
clean the
faucet
. You will damage the
plated finish and void your guarantee.
The aerator screen fitted to the hot/cold
water outlet may need occasional
cleaning. This will be evident when the
water flow slows down to an
unacceptable level. This is
accomplished by unscrewing the outlet
in an anti clockwise direction, then
rinse thoroughly in clean water and re-
install.
Important Notice
When installed in accordance with
these installation instructions, the
Franke Triflow System will give many
years of trouble free service.
Failure to
correctly install and maintain this
product will invalidate the warranty,
we
therefore recommend that this product
i
s
in
s
talled by a registered plumber.
DO NOT connect this product to the
m
ain
s
water supply, where the supply
pressure exceeds 100psi (7 bar). If in
any doubt, please ask your registered
p
lumber t
o c
hec
k
the w
at
er pressures.
Failure to comply will invalidate the
product warranty.
DO
NO
T
u
se an
y
greases or solvents
containing hydrocarbons to lubricate
the threads on the filter housing unit.
Failure to comply will invalidate the
product warranty.
ENSURE th
at
the fi
lter cartridge is
changed at the recommended intervals.
Failure to comply may invalidate the
product warranty.
INCORRECT INSTALLATION OF THIS
PRODUCT WILL IMPAIR ITS
PERFORMANCE AND IN SEVERE CASES
COULD CAUSE THE SYSTEM TO FAIL,
LEADING TO FLOODING.
General Information
1
The Franke Triflow is not a water
softener, and unlike some jug filters,
does not remove the minerals
essential to good health and taste.
In hard water areas, calcium, perhaps
the most essential of these minerals
forms a precipitate when the water is
boiled. Most commonly this forms a
scale in the kettle, and in extreme
cases, appears as white flecks in the
boiled water or as a surface film on
tea and coffee.
A convenient remedy for this
problem is to use one of the new
generation of kettles now available.
These kettles incorporate a special
screen which removes the
precipitate but not essential
minerals thereby complementing the
use of your Triflow system.
2 If you plan to be away from home for
more than two or three days, we
recommend turning off the main
water supply to the filter. Once
turned on again, allow the water to
run for a few moments before use.
3 If you plan to be away from home for
extended periods, or the filter
housing may be subject to the risk
of
fr
eez
in
g, you must turn off the
m
ain w
ater supply to the filter and
remove residual water from the filter
housing (see cartridge replacement
sheet). Once turned on again, allow
the filtered water to run for two
minutes before use.
4 Take care when moving things under
the sink unit or you may cause a
leak by damaging the plastic tubes
leading to and from the filter
hou
s
ing.
5 When comparing the taste of the
fi
ltered water with the untreated
water use a clean glass and drink
the filtered water first.
Franke Triflow
Care & Maintenance
Franke Triflow
Introduction and Installation
Introduction The Franke Triflow is manufactured to exacting
standards. Carefully installed and maintained it will give
many years of trouble free use.
Ideally installed on an equal pressure system. The Triflow
allows Hot and Cold water to mix in the body. If the supplies are
imbalanced, control of the mixing temperature may be affected.
Check valves should be fitted to the supplies when used on an
imbalanced system.
Before you proceed...We recommend you engage the
services of a registered plumber to install this product.
Read the instructions and diagrams in this leaflet carefully.
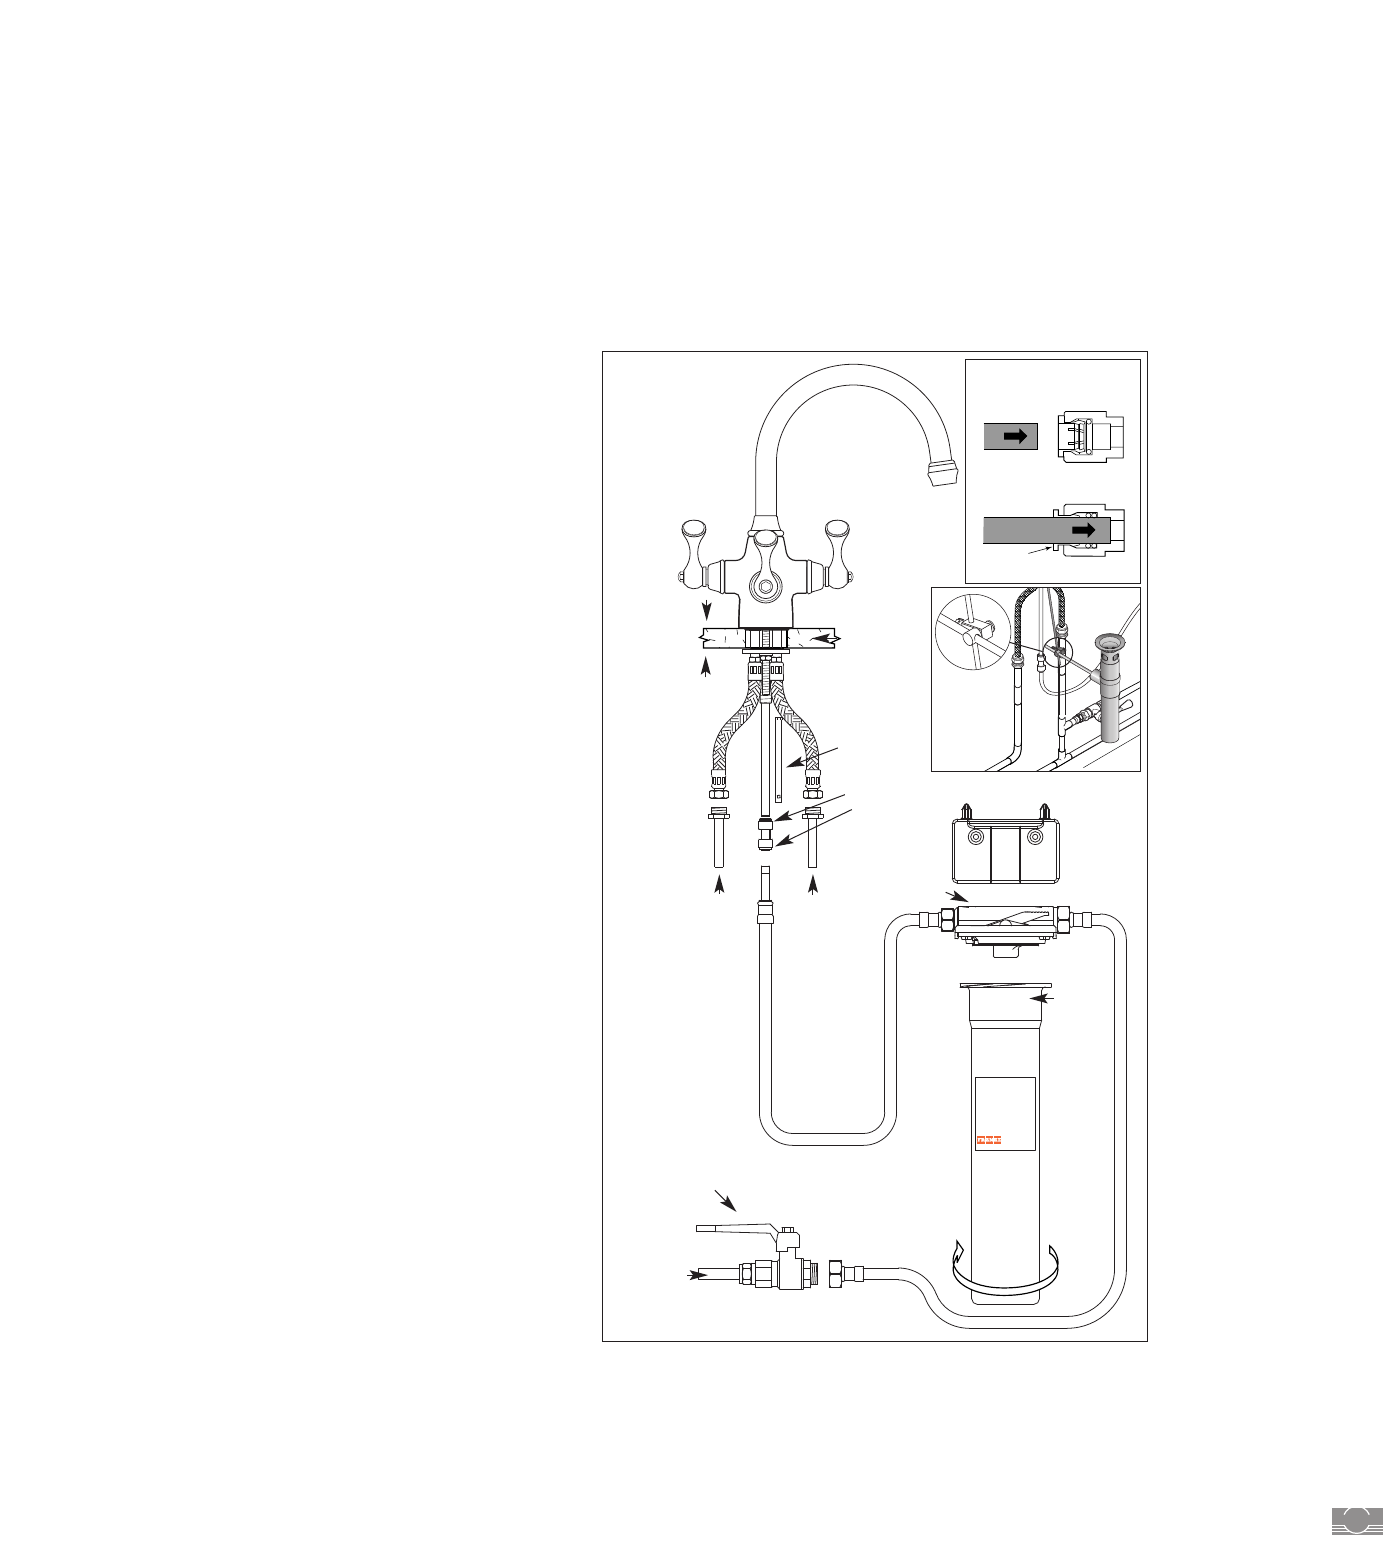
Faucet installation
1 The faucet requires a Ø1
3
/8” hole in the mounting surface.
2 Remove the securing nut, washer and ‘C’ clamp from the
mounting stud.
3 Insert the tails through the hole, ensuring that the rubber
seal remains in place between the base and the work
surface.
4 From the underside of the work surface replace and fully
tighten the ‘C’ clamp, washer and nut onto the mounting
stud.
5 Connect the hot and cold supplies
6 Make sure that the gray collar is in place in the end of the
push fit connector supplied and push onto the filtered
water tube. Check that it is pushed fully home to ensure
a watertight seal.
7 After installation, if building work is to be carried out
nearby, the faucet should be covered to prevent paint, tile
adhesive etc, damaging the surface finish. This is
particularly important for the finishes other than chrome.
Filter system installation
1 Make sure to remove any protective packing from around
the cartridge and remove the plastic plugs from the inlet
and outlet of the filter cap.
Please note: The cartridge is fragile and may break if
mishandled or dropped.
2 Undo the two halves of the filter housing. Hold Cap ‘B’
whilst pressing down on the safety clip and unscrew
Housing ‘A’ a quarter turn in the direction of the arrow
shown. Place housing ‘A’ to one side.
3 Wet the two ‘O’ seals on the threaded end of the new
c
ar
tridge, then screw it firmly into the female thread in
the Cap ‘B’.
4 Fit Cap ‘B’ and Housing ‘A’ back together and turn a
quarter turn in the opposite direction of the arrow shown
to lock.
5 Position the stop valve to allow easy access to turn off
water supply.
6 Position the filter to allow easy access for future cartridge
changes.
7 Position the tubes neatly to avoid side strain and the
possibility of accidental damage.
8 Water must flow through the filter in the direction of the
arrow on the top of cap.
H
O
T
P
U
R
E
C
O
L
D
SERIAL NUMBER
FR 000000
Franke Triflow
1
3
/
8
”
Diameter
Ho
le
A
B
Stop
V
alv
e
Bracket
Gray Collar
US
Ø
3
/
8
” HOT IN
Diagram B
Push Fit Connections
Push Fit
A
DETAIL A
Diagram C
Waste
Connections
Ø
3
/
8
” COLD IN
Ø
3
/
8
” TUBE
Box
spanner
Diagram A
T
ypical Installation
M
ain Cold
W
at
er
S
up
p
ly
Max
1
3
/
4
”
9 F
or optimum filter performance use the stop valve to set the
filtered water flow to 2
3
/4 - 3
1
/2 pints/min (1
1
/2 - 2
liters/min)
.
10 Check system carefully for leaks.
11
Please ensure that the installation complies with the local
p
lumb
in
g c
odes.
12 If
y
ou need t
o remove the hose from the push fit connector,
(see diagram B) use your thumb and forefinger to hold in the
collar while gently pulling the tube out.
Katadyn
Katadyn
Katadyn
Katadyn of Switzerland
Exclusive suppliers ofFilter Cartridgesfor Franke Triflow