10
General Cleaning (continued)
To Raise and Lower the Top for Cleaning
The cooktop is hinged and can be raised to clean the area underneath. Be sure all cooktop controls are turned to OFF and burner
grates are cool.
1. Remove controls knobs, burner grates and spillover bowls. Set aside.
2. Grasp the front of the cooktop and lift. Some models have a swing-up rod to support the cooktop in its raised position.
3. Clean under the cooktop.
4. Lower the top gently after lowering the support rod (some models).
5. Replace bowls, grates and control knobs.
WARNING
When lowering the top, grasp the sides with fingertips only. Be careful not to pinch fingers. Also, DO NOT drop
or bend the cooktop when raising or lowering. This could damage the surface.
WARNING
DO NOT turn on the burners when the cooktop is raised for cleaning. Be sure that the top is completely lowered
and securely in place before turning on the burners.
To Remove and Replace Burners
The burners on your cooktop may be removed for cleaning. Be sure all controls are
turned to OFF and burner grates are cool before removing cooktop burner units.
To Remove Burners
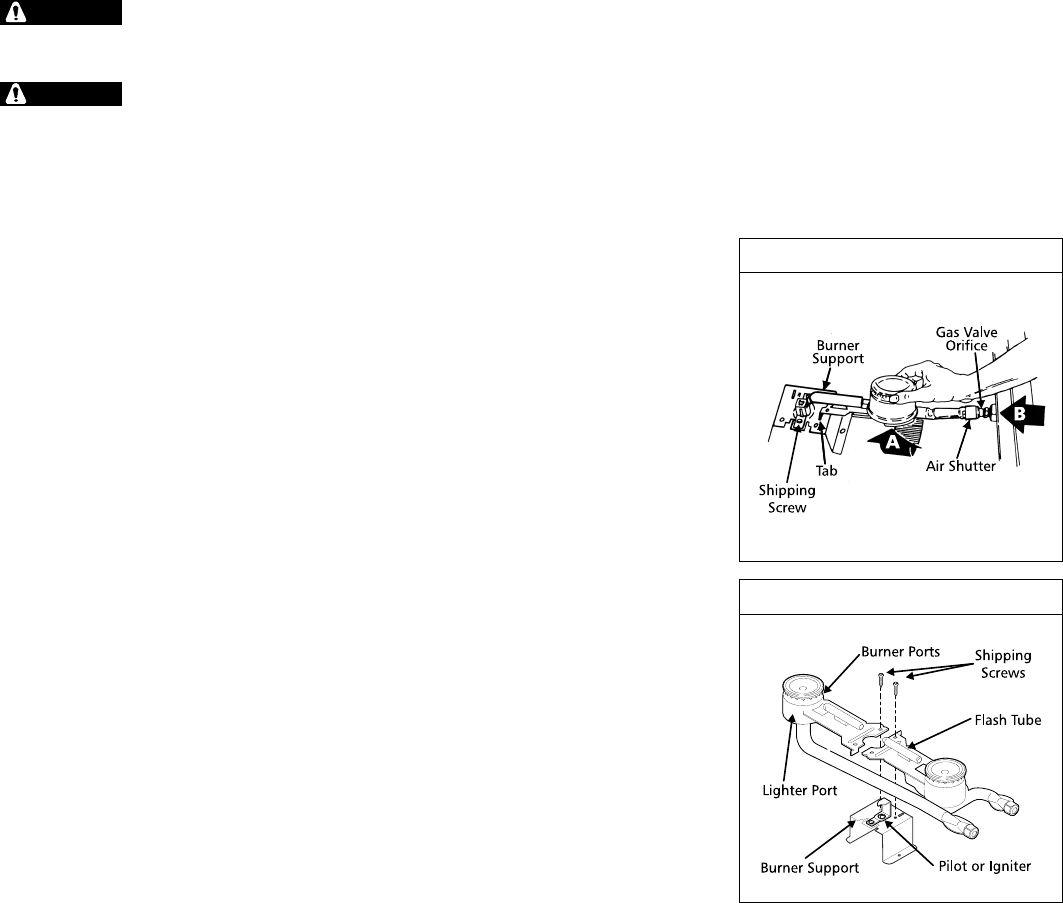
1. Remove the shipping screws from the support bracket. See illustrations for location
of screws.
2. Grasp the burner head and tilt it to the right to release the tab from the burner
support (A in Figure 1).
3. Lift the end of the burner assembly. Then pull away from the front of the cooktop to
free the air shutter from the gas valve orifice (B in Figure 1).
If your cooktop is equipped with a standing gas pilot, use caution when removing
burner. The flash tube may be hot because it is located near the pilot.
Check the lighter and burner ports (Figure 2). If they are clogged, use a wire or needle
to clear them.
To remove burned-on food, soak the burners in a vinegar and water solution for
20-30 minutes. For stubborn stains, scrub with soap and water or a mild abrasive cleanser
and a damp cloth. Do not wash burners in a dishwasher.
To Replace Burners
1. Slide the air shutter over the gas valve orifice (Figure 1).
2. Lower the burner assembly and hook the tab in the slots in the burner support.
Make sure it is properly seated and level.
3. Be sure both tabs are in the correct slots, the burner sits level and straight, and the
flash tube forms a straight line from the igniter to the burner (Figure 2).
4. Replace shipping screws if desired. These screws are not necessary for the operation
of the burner. They stabilize the burner during shipping of the appliance. Retain the
screws for later use in the event the range is moved.
Figure 1
Figure 2


