


1-19
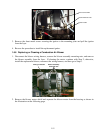
17. Remove the screws in the back panel and inside the flue cap at each end that secure the flue cap
to the fryer and lift it clear of the fryer.
18. Disconnect the oil return line(s) from the frypot to be removed.
19. Carefully lift the frypot from the fryer cabinet.
20. Remove the drain valve(s), temperature probe(s), high-limit thermostat(s), and ignitor
assemblies. Inspect each of these components carefully and install them in the replacement
frypot if they are in serviceable condition. Use Loctite
®
PST56765 sealant or equivalent on
component threads.
NOTE: Some servicers, based upon their experience, recommend that probes and thermostats
be replaced whenever a frypot is replaced; however, this remains the customer’s decision.
21. Reverse steps 1-19 to reassemble fryer.
NOTE: Care should be taken not to over-torque nuts on frypots made of 400-series stainless
steel, as this could tear the material. One turn past hand-tight is sufficient torque.
22. Perform steps 14 through 18 of Section 1.6.8 to ensure that there are no leaks in the burner
insulation.
CAUTION
Before installing temperature probe, high-limit thermostat, and drain valve on
replacement frypot, clean the threads and apply Loctite
®
PST56765 thread sealant or
equivalent.
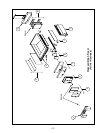
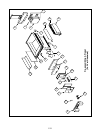
1.6.11 Replacing Frypot Insulation and/or Upper Burner Rails
NOTE: Replacing the burner rails requires completely tearing down the frypot and installing new
frypot insulation. Refer to the frypot exploded view on page 1-21 for component identification.
1. Remove the frypot per Section 1.6.10.
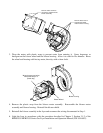
2. Remove the burner assemblies (1).
3. Remove insulation retainers and blanket insulation (2).
4. Remove the upper oil zone insulation bracket and upper oil zone insulation (3).
5. Remove the plenum (4).
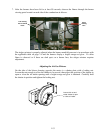
6. Remove the front lower combustion chamber insulation retainer and insulation (5), and the front
lower combustion chamber inner insulation retainer and insulation (6). NOTE: Full-vat units
have two-piece insulation retainer and insulation components. Dual-vat units have one-piece
components.
7. Remove the upper combustion chamber insulation retainer and insulation (7).