


SUPER RUNNER SERIES GAS FRYERS
CHAPTER 2: OPERATION
2-2
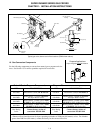
5. Fill the frypot with oil, shortening or water to the bottom OIL LEVEL line scribed on the frypot back. Ensure
heating tubes are covered in liquid prior to engaging burners.
NOTE: If solid shortening is used, pack the shortening into the frypot, ensuring the shortening is packed beneath,
between and above the tubes prior to operating fryer.
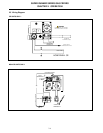
6. Open the manual shut-off valve on the incoming gas supply line and rotate the gas valve knob to the PILOT
position.
7. Push and hold the knob in and apply a lighted match or taper to the pilot burner head. Continue to hold the knob in
for about 60 seconds after the flame appears on the pilot. Release the knob. The pilot should remain lit.
DANGER
If the pilot fails to remain lit, turn the gas valve "OFF" and wait 5 minutes before attempting to re-light.
CE UNITS ONLY:
1. Ensure that the following steps are done in sequence before lighting or re-lighting the pilot:
2. Turn off the manual shut-off valve on the incoming service line.
3. Turn the operating thermostat "OFF".
4. Depress the red button on the safety control valve to turn "OFF".
5. Wait at least 5 minutes for any accumulated gas to disperse.
6. Fill the frypot with oil, shortening or water to the bottom OIL LEVEL line scribed on the frypot back. Ensure
heating tubes are covered in liquid prior to engaging burners.
NOTE: If solid shortening is used, pack the shortening into the frypot, ensuring the shortening is packed beneath,
between and above the tubes prior to operating fryer.
7. Open the manual shut-off valve on the incoming service line.
8. Apply a lighted match or taper to the pilot burner head. (If fryer is equipped with a piezo ignitor, go to Step 9).
9. Press the white button on the gas valve and hold approximately 45 seconds to 1 minute, until the pilot stays lit. (If
fryer is equipped with a piezo ignitor, press and hold the white button, then repeatedly press the piezo ignitor button
until the pilot lights. Release the white button after approximately 45 seconds to 1 minute.)
10. If the pilot does not stay lit, depress the white button and re-light the pilot, holding the button in longer before
releasing. Trapped air may necessitate re-lighting the pilot several times until a constant gas flow is attained.
11. When the pilot stays lit, release the white button.
2.1.3 Lighting the Burners
WARNING
NEVER set a complete block of solid shortening on top of the heating tubes. To do so will damage the
heating tubes and frypot, and void the warranty.
1. Ensure the frypot is filled with oil or shortening to the lower of the two oil level lines embossed on the back wall of
the frypot. NOTE: If solid shortening is used, pack the shortening into the frypot, ensuring the shortening is packed
beneath, between and above the tubes prior to operating fryer.