


ULTIMATE ELECTRIC SERIES FRYERS
CHAPTER 2: INSTALLATION INSTRUCTIONS
2-4
3. Close fryer drain-valve and fill frypot with water to the bottom OIL LEVEL line.
4. Boil out frypot prior to first use. See Frypot Boil-Out instructions in Section 2.4.
5. Drain, clean, and fill frypot(s) with cooking oil. See Section 2.5, Equipment Setup and Shutdown
Procedures.
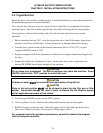
2.3 Power Requirements
DANGER
Copper wire suitable for at least 167°F (75°C) MUST be used for power connections.
MODEL VOLTAGE PHASE WIRE
SERVICE
MIN.
SIZE
AWG
(mm
2
)
AMPS PER LEG
L1 L2 L3
17 kW 208 3 3 6 (16) 48 48 48
17 kW 240 3 3 6 (16) 41 41 41
17 kW 480 3 3 6 (16) 21 21 21
17 kW 220/380 3 4 6 (16) 26 26 26
17 kW 240/415 3 4 6 (16) 24 24 24
17 kW 230/400 3 4 6 (16) 25 25 25
21 kW 208 3 3 4 (25) 58 58 58
21 kW 240 3 3 4 (25) 51 51 51
21 kW 480 3 3 6 (16) 25 25 25
21 kW 220/380 3 4 6 (16) 32 32 32
21 kW 240/415 3 4 6 (16) 29 29 29
21 kW 230/400 3 4 6 (16) 30 30 30
DANGER
The electrical power supply for this appliance MUST be the same as indicated on the rating
and serial number plate located on the inside of the fryer door.
DANGER
This appliance MUST be connected to the voltage and phase specified on the rating and
serial number plate located inside the fryer door.
DANGER
All wiring connections for this appliance MUST be made in accordance with the wiring
diagrams furnished with the equipment. Wiring diagrams are located inside the fryer door.