


8
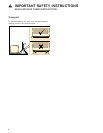
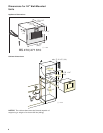
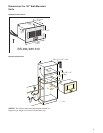
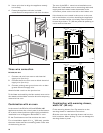
Removing Packaging
NOTICE: To prevent damage to your floor keep the
unit in its packaging base until ready to be placed in
the cabinet opening. Do not slide the unit across the
flooring.
Different models use different packaging materials.
Actual brackets may look differently. Bracket remains
in packaging base.
1 Cut straps on outside of box.
2 Remove cardboard box.
3 Remove all top and side cardboard and Styrofoam
braces.
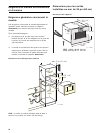
4 Place oven in front of cabinets where it is to be
installed.
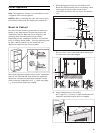
Water connection
The appliance is backflow-proof (DVGW tested).
Connection valves with backflow preventers are not
required. Follow the regulations of the local water
utility.
Install a suitable descaling system in front of the
appliance if the water hardness exceeds 7 dH. We
recommend the GF 111 100 descaling and taste filter
(available as a special accessory).
Only connect the appliance to a cold water connection
(¾" hose connection, water pressure 2 - 10 bar).
Note: Mount the supply hose on the appliance with
the terminal bracket. Tighten the plastic box nut only
by hand!
The water connection for the supply hose must always
be accessible (not directly behind the appliance).
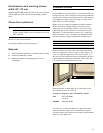
Waste water connection
Provide for an odor trap on the drain connection. The
connection on the odor trap must always be
accessible (not directly behind the appliance).
Important notes on the drain hose
▯ Do not fit the drain hose at any point higher than
the bottom edge of the appliance
▯ Drain: at least ø1.6” (40 mm) inner diameter
▯ Drain connection: at least 4” (100 mm) lower than
the appliance drain
▯ Do not kink the drain hose
▯ Do not shorten the included drain hose
▯ Drain hose: no more than 5.5 yards (5 m) long
▯ Remove the transport lock from the drain hose
(metal clip) on the rear of the appliance