


16
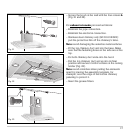
Proceed as follows:
– From the bottom edge of the hood, mark a center
line on the wall.
– With the aid of the drilling template, mark the
positions of the screws on the wall (Fig. 19).
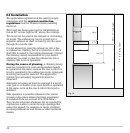
Note: this hood has been approved for installations
as low as 30´ ´ and as high as 36 ´ ´ above the cooktop.
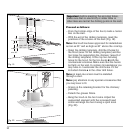
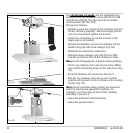
– Using the drilling template, drill the 6 holes for
the hood (area I of the drilling template) and the
two holes for suspending the chimney (area II of
the drilling template). In the top two securing
holes for the hood, fix the two hooks d with the
countersunk screws c. Make sure that the hooks
lie flatly on the wall. In certain circumstances you
may have to countersink the drill holes. Fit the
included dowels a in the other drill holes.
Note: at least one screw must be installed
through a stud.
Note: pay attention to any special accessories that
you may have to fit.
– Screw on the retaining bracket for the chimney
paneling.
– Detach the grease filters.
– Hang the hood on the two hooks. Adjust the
suspended element with the recessed head
screw and align the hood using a spirit level
(Fig. 20).
16"
4"
10
5
/
8
"
19
/
32
"
9
1
/
16
"
3"
6
1
/
4
"
11
13
/
16
"
12
3
/
16
"
Fig. 19
Fig. 20
Important: before marking the securing holes,
make sure that no electricity or water lines or
other lines are laid at the drilling points in the wall.
min.
30”