


27
G
26
G
With the use of the GARDENA Grass Catcher, Art. No. 2491,
you save yourself the trouble of raking up the mowed grass.
Good grass catching results can be obtained by cutting the grass
when it is dry and pushing the mower at a fast walking speed.
5. Maintenance
Clean the mower after use and lubricate with an oil of low viscosity
(e.g. spray-oil). Grease the cutting blades.
The cutting gear of your lawn mower was optimally adjusted be-
fore leaving our company. If, after longer use, a clean cut of the
grass is no longer possible or the blade roller contacts the lower
blade, then the lower blade should be adjusted as follows:
v Push the supplied thickness gauge
5
on the left side between
a blade of the blade roller and the tower blade.
v Turn the hexagonal bolt
6
to the right using a 10 mm fork
wrench until the thickness gauge is slightly contacted.
v Repeat this procedure on the right side of the mower.
v Now turn the blade roller as a test; it should not touch any of
the five cutters on the lower blade.
Handling the cutting gear should be carried out with special
care (danger of Injury by cutting).
After you have adjusted the cutting gear, carry out a cutting test
with newspaper.
If you take proper care of the cutting blade it will remain sharp for
many years. When it comes time to change the blade, however,
please contact GARDENA Customer Service.
Repairs of the lawn mower and installation of the blades can be
carried out by a suitable workshop.
Have your lawn mower checked in autumn, if possible, so that it is
immediately ready for use for the next mowing season.
For safety reasons, only use original GARDENA spare parts or
parts approved of by the manufacturer.
6. Storage
Store the mower in a dry room. Lubricate with machine oil.
Adjusting the cutting gear
(Fig. D):
Cutting test with
newspaper (Fig. E):
Sharpening of the blades /
Repairs
Mowing with a
grass catcher (Fig. F)
Take special care when moving backwards and when pulling the
lawn mower. Danger of stumbling!
Never place your hands or feet on or under moving parts.
If the cutting tools or the lawn mower should run into an obstruc-
tion and/or solid objects, the lawn mower should be properly
and thoroughly inspected.
Only work when visibility is good.
If you come into contact
with an obstruction
during mowing:
Pay attention to the
working environment
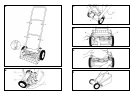
3. Assembly
The rod yoke is mounted with the bolts supplied. The rod on the
left side
1
with the bore hole Is pushed over the rod bolt.
This can only be performed when the yoke is in the vertical posi-
tion, since the groove in the bore hole and the safety peg have
to fit exactly.
On the right aide
2
, the yoke borehole is pushed downwards
and over the second rod bolt by applying slight pressure.
4. Operation
The GARDENA Hand Lawn Mower is able to mow grass up to
14 cm length.
However, if the lawn is supposed to be well kept, the grass should
always be kept shorter.
At the beginning of the cutting phase and on newly laid lawns, a
relatively high cutting height should be chosen. With subsequent
cuts, the height should be made gradually lower. In order to obtain
a well-kept lawn, the cutting height should be adjusted to approx.
2 cm.
Try to cut your grass weekly, if possible. A cropped blade of grass
grows well when cut frequently.
Only cut the grass when It Is relatively dry.
In order to obtain a clean cut, push the mower in tracks as straight
as possible at walking speed. The cutting tracks should always
overlap by several centimetres with this so that a grass strip is not
left behind.
For this, position the lawn mower on solid, level ground.
v Stand behind the lawn mower so that you can put a foot on the
roller
1
(Fig. B/C).
v Loosen both set-screws
2
. Now you can adjust the desired cut-
ting height with both hands using the adjusting depressions
3
(Fig. C).
Highest cut:40 mm
Lowest cut: 20 mm
v Make sure that the cutting height markers
4
Indicate the same
cutting height on the scales on both sides.
Now the two set-screws
2
should be tightened again.
The mower may only be adjusted to a depth in which the lower
blade does not touch the ground when it is uneven.
Assembling the rod yoke
(Fig. A):
How to cut correctly
Adjusting the cutting height
(Fig. B, C):