Part # P153 Rev 1 (02/21/08)Page 16
Griddles
After Each Use
1. Using a traditional 2 1/2” – 3” (64mm –76mm) scraper
or spatula, scrape the griddle surface (to remove food
particles and oil residues) towards the grease trough
using even front to back strokes. Deposit debris into the
chute.
2. Pour shortening or oil onto the griddle surface using
straight front to back motion. Clean the griddle using a
griddle stone or grill screen. Always wipe with the grain
of the steel, never sideways.
3. Using a clean cloth, rub a thin and even layer of oil into
the griddle surface.
4. Remove the grease drawer, empty and wash thoroughly
with soap and water. Replace.
For Heavy Build Up
NOTE: After using cleaners and grease cutters, re-season the
griddle.
Apply to a warm griddle for best results.
1. Using a traditional 2 1/2” – 3” (64mm –76mm) scraper
or spatula scrape the griddle surface (to remove food
particles and oil residues) towards the grease trough
using even front to back strokes. Deposit debris into the
chute.
2. Apply griddle cleaner evenly over the griddle surface and
let sit as directed. Follow the procedures on the label of
the specic cleaning product.
3. Using a traditional scraper or spatula, slosh around the
griddle cleaner to remove the build up.
4. Scrape the griddle surface towards the grease trough
using even back to front stokes. Repeat step 2 if
necessary.
5. Using mild detergent, clean the surface and rinse
thoroughly with water and vinegar solution. Dry griddle.
6. Using a clean cloth rub a thin and even layer of oil into
the griddle surface.
7. Re-season the griddle as detailed in initial cleaning. The
griddle is now ready for use.
MAINTENANCE AND CLEANING Continued
Griddle Do’s & Don’ts
Do’s
1. Season the griddle. This will prevent food from sticking
and make it easier to keep the surface clean.
2 Keep the surface clean. Scraping the surface thorough
out production to clear foods and oils prevents build up
and will make it easier to keep the surface clean.
3. Turn the temperature down during slow periods.
Reducing the temperature or turning sections o during
slow times will conserve energy and prevent the plate
from overheating.
Don’ts
1. Do not use salt to clean the griddle surface, Salt is
corrosive and can cause pitting of the griddle.
2 Do not allow metal utensils (Spatula, scraper, etc.) to
nick and/or dent the surface of the griddle. The edges of
these utensils are sharp and will create divots that oil can
collect and caramelize with will cause sticking.
3. Do not use the griddle as a hot top. A large pan or pot will
trap heat and can cause the griddle plate to warp.
4. Do not over heat the griddle to preheat faster. Preheating
only takes 15-20 minutes.
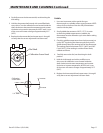
Thermostat Calibration
WARNING: Turn o the electrical mains before
commencing any service work.
Oven
It is normal for an electromechanical thermostat to cycle with
a 45°F - 50° F (25°C - 28°C) range when checking calibration
allow the thermostat to cycle a minimum of two times.
1. Place the thermocouple of the test instrument in the
center of the oven.
2. Turn the oven temperature control dial to 400° F (205°
C). In order to allow the oven temperature to stabilize,
the oven control must be allowed to cycle twice before
taking a test reading.
3. Check the temperature reading just when the control
cycles “OFF” as indicated by the cycling pilot lamp. If the
temperature does not read with in 15° F (8°C) of the dial
setting, recalibrate as follows:


