


6
INSTRUCTIONS FOR USE
For your safety, always read and understand this Instruction Manual before attempting to
use any electric appliance.
Before Using:
1. Carefully unpack the blender. Remove all packaging materials.
2. Wash the lid, measuring cap, blade assembly, and glass jar in hot soapy water. Dry
thoroughly.
3. Wipe exterior surfaces of the base with a soft, moist cloth to remove residue that may
have collected during packing and handling. Dry thoroughly. Do not use abrasive
cleaners. NEVER IMMERSE THE BLENDER, CORD OR PLUG IN WATER OR ANY OTHER
LIQUID.
4. Be sure all parts are properly assembled and in place before use.
Blade Assembly:
Note: Before blending, be sure the black locking ring is tightened to prevent leakage.
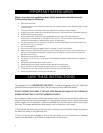
1. Line up the two round indentions on the metal jar collar with the two round bumps on
the glass blending jar (see figure 8).
2. Place the silicone sealing ring on the bottom of the glass jar.
3. Angle the blade assembly so one of the taller blades goes into the glass jar (see figure
9). Slowly lower the blade assembly so that the other blades enter the glass jar and
the blade assembly sits flat on top of the silicone sealing ring.
4. Replace the black locking ring around the blade assembly and rotate the black
locking ring clockwise until it is tightened (see figure 10).
Note: If you notice liquid leaking at the bottom of the glass blending jar, remove the black
locking ring and re-tighten it.
Blending:
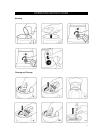
1. Before starting, make sure the blender is in the off position. The off position is when
the blue indicator dot on the speed selector knob aligns with the “0” marking.
2. Add ingredients to the blending jar (see figure 1).
3. Place lid on blending jar (see figure 2). Make sure the metal jar collar is properly
seated on the die cast base.
4. Plug the power cord into a wall outlet. The blue power indicator light in the middle of
the speed selector knob will illuminate, indicating the blender is ready for operation.
Note: The blue indicator light will remain illuminated until the appliance is
unplugged from the wall outlet.
5. Rotate the speed selector knob clockwise to select speeds 1 (low), 2 (medium), or 3
(high) (see figure 3). Rotate the speed selector knob counter-clockwise to select the
crush setting (see figure 4).
Crush Setting: use this setting for ice crushing and chopping. The crush setting
operates intermittently so the blender crushes at full power for about 3 seconds and
then stops briefly before crushing at full power for another 3 seconds. The crush
function will continue until the speed selector knob is returned to the “0” position.
This operation allows the larger chunks of ice or other contents to settle back into the
blade area for maximum blending performance.