OPERATION
Before first use
Remove all packaging materials, labels and/or stickers from your blender.
Clean your blender thoroughly before using for the first time ( Cleaning).
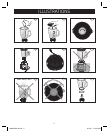
WARNING: Do not immerse the base (13) in water or any liquids (ill.
f
). This may cause
electric shock or damage the appliance.
Operating instructions
Before plugging in the blender, check that the electrical circuit is not overloaded with
other appliances.
Set the base (13) on a flat, even and steady surface.
Put the prepared ingredients into the glass jar (17) (ill.
a
). Cover the jar (17) with
the lid (19) (ill.
b
). Make sure that the mouth (18) of the jar (17) is firmly covered
by the lid (19).
Insert the measuring cup (20) into the hole of the lid (19). Turn clockwise to lock in
place (ill.
c
).
Tip: When not following one of the recipes located at the end of this manual, add liquid
ingredients into the jar (17) first before adding food pieces. This way all ingredients are
mixed evenly. For best results, cut solid food into approximately 0.5 inch (1.3 cm) to 1
inch (2.5 cm) cubes. Cut cheese into pieces no larger than 0.5 inch (1.3 cm).
WARNING: Do not fill the jar (17) with any hot liquid or run the appliance empty (ill.
g
).
Do not rinse the glass jar (17) with hot water after preparing cold food.
Put the glass jar (17) onto the base (13) (ill.
d
). Fit the wide base (14) onto the top
of the base (13).
Insert the plug (12) into the wall outlet. The power ON/OFF button (1) lights up
blue at 25% of its overall intensity. The blender is in stand-by mode.
Press the power ON/OFF button (1) to switch on the blender. The LCD display
turns on and blinks blend and shows default speed 12, the highest setting. All other
indicators are off.
The timer is not active, blender works as normal blender. If the user will not set the
timer the unit will run for a default time of 2 minutes and then stop automatically.
To switch off the blender, press power ON/OFF button (1) again. Disconnect the
plug (12) from the wall outlet before you take the jar (17) from the base (13).
•
•
•
•
•
•
•
•
•
•
6
169202-EN-10.indd 6 6/1/09 1:14:28 PM


