


Consumer Support
Troubleshooting Tips Operating Instructions Safety InstructionsInstallation Instructions
8
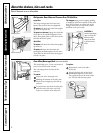
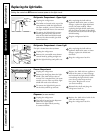
About the shelves, bins and racks.
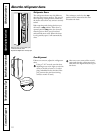
Refrigerator Door Bins and Freezer Door Tilt-Out Bins
Large Bins
The larger refrigerator door bins and
freezer tilt-out door bins are adjustable.
To remove: Lift the front of the bin straight
up, then lift up and out.
To replace or relocate: Engage the back side
of the bin in the molded supports of the
door. Then push down on the front of the
bin. Bin will lock in place.
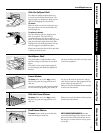
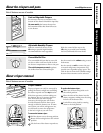
Small Bins
To remove: Lift the front of the bin straight
up then out.
To replace: Position the bin above the
rectangular molded supports on the door.
Then slide the bin down onto the support
to lock it in place.
The snugger helps prevent tipping, spilling
or sliding of small items stored on the door
shelf. Place a finger on either side of the
snugger near the rear and move it back
and forth to fit your needs.
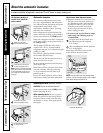
CAUTION: Be
careful when placing
items in the top bin.
Make sure that
items do not block
or fall into the ice
chute.
Not all features are on all models.
Refrigerator bin
Freezer tilt-out bin
Snugger
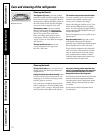
Door Wine/Beverage Rack (on some models)
This rack holds up to 5 cans, one bottle of
wine or one 2-liter bottle of soda.
The rack hangs from the sides of the
dairy bin.
To remove:
Empty the wine/beverage rack.
Holding the bottom of the dairy bin,
lift the front straight up, then lift up
and out.
To detach the rack from the dairy bin,
pull the rack’s side wires out of the
holes on each side of the dairy bin.
To replace:
Reattach the rack to the sides
of the bin.
Engage the back side of the bin in
the molded supports on the door.
Then push down on the front of the
bin. The bin will lock into place.
Do not block