


6
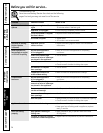
Controls and features—Beverage Center and Wine Chiller.
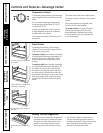
The full extension drawer fronts on the wine
chiller and beverage center are unfinished
beech wood. During use, oil from hands
may accumulate and stain the wood.
• The drawer fronts may be stained and
sealed to match adjacent cabinetry. The
tinted glass will make the stained wood
appear darker. A true color match can
be seen only when the door is opened.
• Apply the stain and sealer according to
the manufacturer’s instructions. To avoid
unpleasant odor, keep the door open to
ventilate and allow the stain/sealer to dry
completely before using the product.
NOTE: Natural wood may vary slightly in grain
and color.
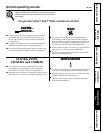
Wood Drawer Fronts
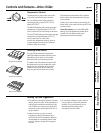
All of the full extension drawers pull out
so bottles can be conveniently added or
removed.
Any of the full extension drawers can be
removed to store larger bottles.
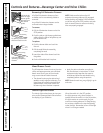
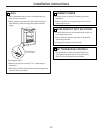
To remove:
1. Pull the full extension drawer out to the
STOP position.
2. Push the tab on right drawer guide down
while pulling the tab on left guide up, and
pull the drawer out.
To replace:
1. Push the drawer slide arm back into
the unit.
2. Pull the small slide sub-assembly
completely forward.
3. Insert the sides of the drawer back into
the guides.
4. Push until the tabs lock into place.
NOTE: Make sure the tabs on the full
extension drawer guides are fully engaged
before loading any bottles. Pull the drawers
out all the way to the STOP position and push
back in several times to make sure locking
tabs are properly engaged.
Removing Full Extension Drawers
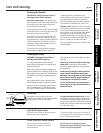
The interior light makes it easy to view your
wine and/or beverage labels and enhances
the display of your collection.
When the switch is in the OFF position,
the light comes on only when the door is
opened. When the switch is in the ON position,
the light remains on continuously for your
maximum viewing pleasure. For best viewing,
do not store a bottle on the top shelf directly
under the light. Remember to turn off the light
when it is no longer needed.
Interior Light and Switch
Consumer Support
Troubleshooting
Tips
Care and Cleaning
Safety Instructions
Operating
Instructions
Installation
Instructions
Tab (push tab
down on right
drawer guide,
pull tab up on
left drawer
guide)
To replace, push drawer
slide arm back into unit
Pull small slide sub-
assembly completely
forward
Sub-assembly
Sub-assembly