


Client: Hamilton Beach (Wal*Mart)
Project: 169199
Language: EN
Date: 23.04.2009
Version: 08
Page: 7 (of 23 pages)
7
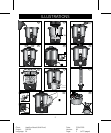
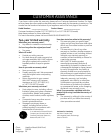
OPERATION
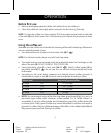
• Wet coffee basket (4) to prevent smaller/finer coffee grounds from sifting through
into water.
• Fill ground coffee into coffee basket (4). Do not spill coffee grounds in the percolator
tube (5)
(ill.
c
)
. Spread coffee evenly in coffee basket (4).
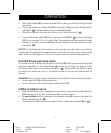
• Place the lid
(2) on the coffee urn and turn until it locks in place
(ill.
d
)
.
• Connect the power cable
(13) with the power socket (12)
(ill.
e
)
. Insert power plug
(13) into a standard 120 V AC wall outlet. The appliance will automatically begin
brewing. The ready indicator (11) lights blue to indicate that the brewing is under
process
(ill.
f
)
.
NOTICE: To avoid damage to the appliance, do not plug in urn when there is no water or
liquid inside. The appliance is equipped with an automatic shut-off function if not enough
water remains in the appliance. This may, however, shorten the life of the appliance.
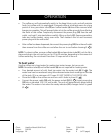
How the brewing process works
The coffee urn will now heat up the water in the tank (6). Boiling water will move up the
percolator tube (5), into the coffee basket (4). Water runs through the ground coffee
and slowly drips back into the water tank
(6)
(ill.
g
)
. Please allow the coffee to brew
for about one minute per cup, i.e., the brewing time for 40 cups will take around 40
minutes.
WARNING! Burn hazard: To avoid accidental contact with hot steam and boiling water:
• Never open the lid (2) while brewing, and
• Wait a minimum of 5 minutes before opening the lid (2).
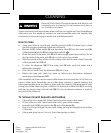
Coffee is ready to serve
• When the brewing cycle is complete, the percolation stops and the ready indicator
(11) changes color to green to indicate coffee is ready to serve.
• To serve coffee: press a cup against the dispensing bar (9); remove cup when it is
filled to desired level
(ill.
h
)
.
• The remaining coffee level can be read from the coffee level indicator
(8)
(ill.
i
)
.