


40
Questions? Call 800.GE.CARES (800.432.2737) or Visit our Website at: ge.com
Installation
Free-Standing
Instructions
Electric Ranges
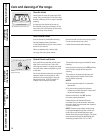
BEFORE YOU BEGIN
Read these instructions completely
and carefully.
•
IMPORTANT — Save these instructions
for local inspector’s use.
•
IMPORTANT — Observe all governing
codes and ordinances.
• Note to Installer – Be sure to leave these
instructions with the Consumer.
• Note to Consumer – Keep these instructions for
future reference.
• Skill level – Installation of this appliance requires
basic mechanical skills.
• Completion time – 1 to 3 hours
• Proper installation is the responsibility
of the installer.
• Product failure due to improper installation is not
covered under the Warranty.
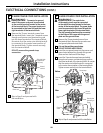
WARNING — This appliance must be
properly grounded.
FOR YOUR SAFETY:
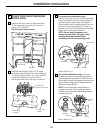
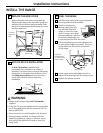
All rough-in and spacing dimensions must be met
for safe use of your range. Electricity to the range
can be disconnected at the outlet without moving
the range if the outlet is in the preferred location
(remove lower drawer).
To reduce the risk of burns or fire when reaching
over hot surface elements, cabinet storage space
above the cooktop should be avoided. If cabinet
storage space is to be provided above the cooktop,
the risk can be reduced by installing a range hood
that sticks out at least 5″ beyond the front of the
cabinets. Cabinets installed above a cooktop must
be no deeper than 13″.
Be sure your appliance is properly installed
and grounded by a qualified technician.
Make sure the cabinets and wall coverings around
the range can withstand the temperatures (up to 200°F)
generated by the range.
FOR YOUR SAFETY:
WARNING — Before beginning the
installation, switch power off at service panel and
lock the service disconnecting means to prevent
power from being switched on accidentally. When
the service disconnecting means cannot be locked,
securely fasten a prominent warning device, such
as a tag, to the service panel.
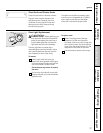
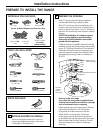
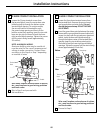
ANTI-TIP DEVICE
WARNING — To reduce the risk
of tipping, the appliance must be secured
by properly installed Anti-Tip bracket packed
with this appliance.
If the Anti-Tip device supplied with the range does
not fit this application, use the universal Anti-Tip
device WB2X7909.
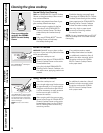
WARNING —
• All ranges can tip
• Injury to persons could result
• Install Anti-Tip bracket packed
with range
• See Installation Instructions
If you pull the range out and away from the wall
for any reason, make sure the Anti-Tip bracket is
engaged when the range is pushed back against
the wall.