


Installation Instructions.
Before you start…
Proper installation
is your responsibility. Make
sure you have everything necessary for correct
installation. It is the personal responsibility and
obligation of the customer to contact a qualified
installer to assure that electrical installation meets
national and all local codes and ordinances.
Grounded electrical outlet is required.
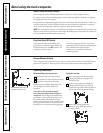
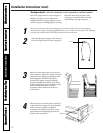
Check the location
where your compactor will be
installed. The cabinet opening should be square.
You should be able to fully open the compactor
drawer. Six inches (15.2cm) of clearance is
needed on the right side of compactor drawer to
be able to remove the compactor bag. Allow 23
inches (58.4 cm) in front of the compactor to
remove drawer.
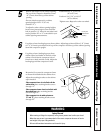
Fire Hazard
Do not let any item fall or collect behind
the compactor.
Failure to follow this instruction could
result in a fire.
WARNING
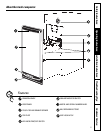
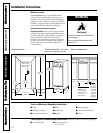
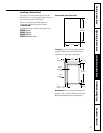
Cutout dimensions
Product dimensions—
The overall
look of your compactor may vary.
Clearance dimensions
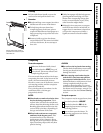
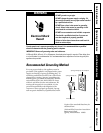
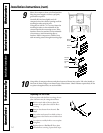
Tools and Materials Needed for Installation
■ Level
■ Phillips screwdriver
■ Flat-blade screwdriver
■ Pliers
■ Utility knife
■ Scissors
■ Measuring tape
■ 5/16″ box-end wrench
■ Gloves
Parts Supplied for Undercounter Installation—
Remove parts from literature package.
■ 2 mounting clips ■ 2 mounting screws
#8 - 18 x 1/2″
Grounded electrical
outlet must be 3″
(7.6 cm) min. from
either side wall.
15-1/4″ min.
(38.4 cm)
18″ min.
(45.7 cm)
24″ min.
(61 cm)
34-1/4″ min.
(87 cm)
34-1/8″ min.
(86.7 cm)
24″ min.
(61 cm)
23″ (58.4 cm)
Clearance in front
of the compactor is
needed to fully open
or remove the
compactor door.
6″ (15.2 cm)
Clearance to
the nearest
vertical wall
on the right
side of the
compactor is
needed to
remove bag.
14-15/16″ min.
(38 cm)
10
Customer Service Troubleshooting Tips
Operating Instructions
Safety InstructionsInstallation InstructionsCustomer Service Troubleshooting Tips Installation Instructions Safety Instructions
Operating Instructions
Customer Service Troubleshooting Tips Installation Instructions Safety Instructions
Operating Instructions