


;@A.99.A6<;;@A?B0A6<;@
"#%'"!"")!(%!%&
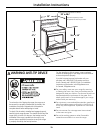
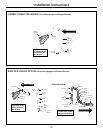
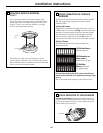
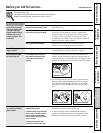
%2:<C2<C2;/<AA<: Remove the 2 screws at the rear of
the oven bottom. Grasp the oven bottom at slots on each side.
Lift the rear enough to clear the lip of the range frame, push it
back, and then pull it up and out.
"#%'"!"&(%
(%!%&
Operation of all cooktop and oven burners should be checked
after the range and gas supply lines have been carefully
checked for leaks.
645A6;4A52B?;2?@
Select a top burner knob and simultaneously push in and turn
to ' position. You will hear a 096086;4 sound indicating proper
operation of the spark module. Once the air has been purged
from the supply lines, burners should light within 4 seconds.
After burner lights, rotate knob out of the ' position. Try
each burner in succession until all burners have been checked.
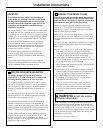
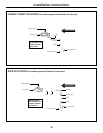
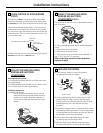
$B.96AF<39.:2@
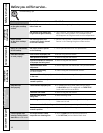
The combustion quality of burner flames needs to be
determined visually.
3/B?;2?39.:2@9<<896820.993<?@2?C602!<?:.9/B?;2?
39.:2@@5<B919<<89682<?12=2;16;4<;A52AF=2<34.@
F<BB@2
With LP gas, some yellow tipping on outer cones is normal.
(C) Soft blue
flames—Normal
for natural gas
(B) Yellow tips on
outer cones—
Normal for LP gas
(A) Yellow flames—
Call for service
Oven bottom
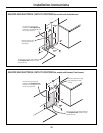
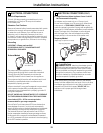
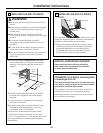
&& &(%(%!%&
"!'
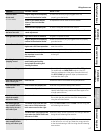
Place the burner heads on the bases matching the
letters. Place the correct size caps on the heads. Make
sure that the caps and heads are placed in the correct
location. There is one small, one medium, one large
and one extra large head and cap.
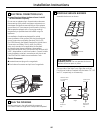
When placing, make sure the locator pins in the
burner head are seated in the pin slots of the burner
base. Rotate the burner head around the burner base
until it is level and securely seated.
Locator
pins
Pin slots