


—-. .
Using Your Oven (continued)
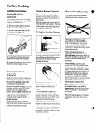
Lighting Instructions
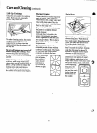
Electric Ignition Models
JGBCMGEJ
JGBCIXW
The oven burner and broil
burner on these ranges are lighted
by electric ignition. The oven and
broiler cannot be operated in the
event of a power failure.
To light the burners, turn the
OVEN SET and OVEN TEMP
knobs to the desired function and
temperature. The burner should
ignite within 60 seconds.
CAUTION: DO N(YI’MAKE ANY
ATTEMPT TO OPERATE THE
ELECT’RIC IGNITION OVEN
DURING AN ELE(T.RICAL
POWER FAILURE. Resumption
of electrical power when OVEN
TEMP and OVEN SET controls
are in any position other than OFF
will result in automatic ignition of
the oven or broiler burner and
could cause severe bums if, at the
time, you were attempting to light
the burner with a match.
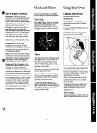
Oven Temperature Control
The OVEN TEMP control is
located at the center of the control
panel on the front of the range.
Simply turn the knob to the desired
cooking temperatures, which are
marked in 25 “F. increments on the
dial. It will normally take 60
seconds before the flame comes on.
Afier the oven reaches the selected
temperature, the oven burner cycles—
off completely, then on with a fuIl
flame-to keep the oven temperature
controlled.
Oven Light
Use the switch on the control panel
to turn the light on and off.
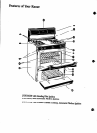
Oven Vent
Your oven is vented through ducts
at the rear of the range (see page 6).
Do not block these ducts when
cooking in the oven—it is important
that the flow of hot air horn the oven
and fresh air to the oven burner be
uninterrupted. Avoid touching the
vent openings or nearby surfaces
during oven or broiler operation—
they may become hot.
● Vent openings and nearby
surfaces may become hot. Do not
touch them.
● Handles of pots and pans on the
cooktop may become hot if left
too close to the vent.
● Do not leave plastic items on”
the cooktop—they may me)t if
left too close to the vent.
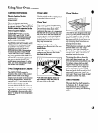
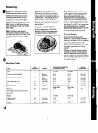
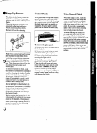
oven Shelves
I I Ii
The shelves are designed with stop-
Iocks so when placed correctly on
the shelf supports, they wiIl stop
before coming completely out of
the oven and will not tilt when you
are removing food from them or
placing food.on them.
When placing cookware on a shelf,
pull the shelf out to the “stop”
position. Place the cookware on
the shelf, then slide the shelf back
into the oven. This will eliminate
reaching into the hot oven.
To remove the shelves from the
oven, pull them toward you, tilt
@
front end upward and pull them out. “
To replace, place shelf on shelf
support with stop-locks (curved
extension under shel~ facing up
and toward rear of oven. Tilt up
front and push shelf toward back of
oven until it goes past “stop” on
oven wall. Then lower front of shelf
and push it all the way back.
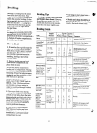
Shelf Positions
The oven has five shelf supports—
A (bottom), B, C, D and E (top).
Shelf positions for cooking are
suggested on Baking and Roasting
pages.
9
h“;..
10