


Installation Instructions
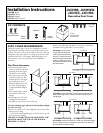
STEP 1 INSTALL CEILING BRACKET
The ceiling bracket must be installed when the duct
cover is used to span 24″ or more height above the
hood. The bracket will hold the decorative duct cover
in place at the top.
Note: The ceiling bracket is not required when using
only the 12″ section of the duct cover.
• Install the 2 small screws into the sides of the duct
bracket. Remove the screws. Pre-tapping the holes will
insure ease of final installation.
• Match center notch on the bracket to the centerline
on the wall and flush against the ceiling.
• Mark the 2 screw hole locations.
• Drill 1/8″ pilot holes in marked bracket location.
• If pilot holes do not enter studs, enlarge the holes to
3/8″ and install wall fastener anchors.
• Secure the bracket to the rear wall with wood screws
and washers. Use wall anchors if needed.
Note: Bracket has 2 sets of holes. Use larger holes for wall
fasteners or wood screws with washers. Use smaller holes for
wood screws with washers.
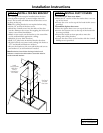
STEP 2 INSTALL DUCT COVERS
To install the 12″ duct cover alone:
• Place the 12″ section of the decorative duct cover on
top of the hood.
• Secure the cover to the top of the hood with 4 screws
provided.
To install the 2-piece duct cover:
• Place the 2-piece duct cover on top of the hood.
• Secure the bottom cover to the top of the hood with
4 screws provided.
• Extend the inside section upwards to meet the
ceiling and ceiling bracket.
• Secure the duct cover to the bracket with the 2 small
Phillips screws provided.
See Step 2
to Install
Duct Cover
Install
Ceiling Bracket
When Duct
Cover is
Used to Span
24" or More
Pub. No. 49-80107
Dwg. No. 164D4290P065
(N.D. 245) 6/01