


6
Before Using for the First Time
1. Remove all packaging materials including those which may be inside
the Bread Slot.
2. Wipe the exterior with a damp cloth. Dry thoroughly. Do not use
abrasive cleaners.
3. Do not put the Toaster, cord or plug in water.
4. Be sure the Crumb Tray is pushed all the way into the Toaster.
5. Unwrap power cord from Cord Storage Area on underside of Toaster.
Important Points
• Remove all protective wrappings from food before placing in Bread
Slot.
• For best results, clean Crumb Tray frequently.
•Different breads require different color settings. Carriage Lever may
be raised manually or press the Cancel Button at any time to check
toast color.
• Do not block top openings. Do not place any object over the top
openings.
• Do not toast buttered bread or buttered pita bread. Melted butter will
cause fire.
•Bread which has been toasted but not buttered may be reheated.
Use a lighter setting and watch it carefully.
• When toasting more than one slice of bread, use slices of similar
size, thickness and freshness.
• Stale bread, thin bread or sweet bread products, such as tea cakes
and fruit loaf, brown much more quickly than ordinary bread, so they
should be toasted on the lighter settings.
• Never immerse Toaster, Cord or Plug in water or other liquid.
• Never use a fork or sharp-edged utensil to remove toast, because
that may damage the heating element or cause injury.
7
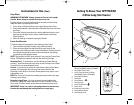
Instructions for Use
Toasting
1. Be sure no bread or other objects are inside the Bread Slot. Place
Toaster on a flat, level, heat resistant surface and plug the power
cord into a 120V AC electrical outlet.
2. Turn the Browning Control Knob to desired setting. Position 1 is the
lightest setting and position 7 is the darkest. You may want to experi-
ment with the Browning Control to determine your preference.
3. Remove any protective wrappings from food before placing into
Bread Slot.
4. Press down on the Carriage Lever until it lowers the bread and locks
into position at the bottom of the Carriage Slide. The centering
guides will automatically center the bread for even toasting.
NOTE: The Carriage Lever will not lock into position unless the
Toaster is plugged in.
5. As soon as the Carriage Lever locks into position, the Cancel Button
will illuminate and the Toaster will begin heating. The first time you
use your Toaster, you may notice a slight odor. This is normal and will
stop as the heating elements continue to heat.
6. The bread will toast to the selected setting then automatically rise
when done. The Cancel Button and the heating elements will turn off
when the bread rises.
NOTE: DO NOT change the Browning Control selection during the
toasting cycle. Press the Cancel Button, change the setting and
replace bread if desired.
Cancel Function: To stop or interrupt the toasting cycle, press the
Cancel Button. The bread will automatically rise and the Toaster will
turn off.
7. Remove bread from Bread Slot. Use care as the bread and Toaster
will still be hot.
8. Repeat steps 3-4 for additional toast as desired. See Keep-Warm
instructions on the next page.
9. When all toasting is complete, unplug Toaster from electrical outlet
and allow it to cool completely.
NOTE: To prevent a fire hazard, never place bread over the opening of a
Toaster, but always place it into the Bread Slot or Keep-Warm Chamber.
Jade_GR_GFT1W,C,R,I_IB_8-8-03 8/8/03 4:00 PM Page 11