


6
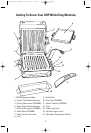
How To Use George Foreman’s Lean Mean
Fat Reducing Grilling Machine
1. Before using the Grilling Machine for the first time, wipe the Grilling Plates and
Sauté Plate with a damp cloth to remove all dust. Make sure both Grilling Plates
are firmly attached to the appliance.
Make sure that BOTH Release Handles of the Grilling Plates are properly
latched and secured on the Grilling Machine Body before use.
2. Attach the Grilling Plates or Sauté Pan: The GRP100 has 3 Plates—1 Lower
Grilling Plate, 1 Upper Grilling Plate and 1 Sauté Plate. Securely attach the
Plates in the appropriate spot using the Release Handles on each side of the
Plates. The Sauté Plate and Lower Grilling Plate should only be attached to the
lower base of the appliance. The Upper Grilling Plate should only be attached to
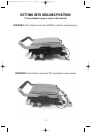
the upper base of the appliance. Use the Plate Position Lock Lever in either
DOWN, locked position or UP, unlocked position*. The down locked position is for
sloped cooking and grilling. The up, unlocked position is for level cooking of
food, sautéing, griddling or baking.
* Refer to page 11 for illustration of grilling positions.
Note: When attaching the Plates, carefully and securely attach each into the
appliance using the Release Handles on the Plates only when plates are cool.
3. Always use a pot holder to carefully open and close the Lid.
4. Slide the liquid-catching Drip Tray under the front of the unit .
NOTE: To set the timer for less than 10 minutes, turn to 10 and then turn back
to the appropriate amount of time.
5. To Preheat: Close the Lid and plug the cord into a 120V AC outlet. Turn the
Adjustable Temperature Control to High temperature. Turn the timer to 5 minutes.
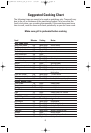
The Power Light (red) will illuminate. See the Suggested Cooking Chart for
specific temperature settings. When the appliance is preheated, the Indicator
Light (green) will come on. Note: When the correct temperature is reached
for preheating, both the Power Light (red) and the Indicator Light (green) will
illuminate. If the Timer elapses to Zero(0) both the Power and Indicator Lights
will turn off.
6. Carefully place or pour the food to be cooked on the lower Plate.
7. Timer: When you have placed the food on the grill, set the Timer to the appropri-
ate number of minutes for appropriate cooking time. The Timer will ring when
done cooking and the Power Light will turn off. Using a pot holder, open the Lid
and check the food. If food has not reached the desired doneness, reset the
Timer for additional minutes.
8. Do not leave the unit unattended during use!
9. When the food is done, turn the Timer off. Disconnect the plug from the wall outlet.
CAUTION: To avoid any sparks at the outlet while disconnecting the plug, make
sure the Power light is off before disconnecting the plug from the outlet.
10. Remove the food using the Plastic Spatula provided. Be sure to always use either
plastic or wooden utensils to avoid scratching the nonstick surface of the Plates.
Never use metal tongs, forks or knives as these can damage the coating on the
Plates.
11. When cool, the Drip Tray may be removed and emptied. Caution: Be sure the
liquid has cooled before removing the Drip Tray.
12. Caution: Do not remove or change the Plates while the unit is hot. The appli-
ance must cool completely before removing or changing the Plates.
GR_GRP100 Series_IB_8-9-07 9/8/07 5:16 PM Page 6