


CARE AND CLEANING
For best performance and safety, keep the oven clean
inside and outside Take special care to keep the inner
door panel and the oven front frame free of food or
grease buitd-up
Never use rough powder or pads. Wipe the
microwave oven inside and out, including the hood
bottom cover, with a soft cloth and a warm (not hot)
mild detergent solution, Then rinse and wipe dr/_ Use a
chrome cleaner and _Nsh on chrome, metal and
aluminum surface& Wipe spatters immediately with a
wet paper towel, especially after cooking chicken or
bacon. Clean your oven weekly or more often if
needed.
METAL RACK
Wash the metal rack with a mild soap and a soft or
nyton scrub brush. Dry comp_etely.
Do not use abrasive scrubbers or cleaners to clean
rack.
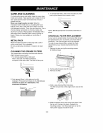
CLEANING THE GREASE FILTERS
The grease filters should be removed and cleaned
often, at least once a month.
I. To remove grease fi_ters, slide each
filter to the side. Pull filters downward
and push to the other side, The filter will drop ouL
2. Soak grease filters in hot water and a mitd
detergent. Rinse well and shake to dry. Do not use
ammonia or place in a dishwasher. The
aluminum will darken_
3, To reinstall the filters, slide it into the side slot, then
push up and toward oven center to lock.
NOTE: Do not operate the hood without the filters in
place.
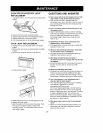
CHARCOAL FILTER REPLACEMENT
If your oven is vented inside, the charcoa_ filter shouid
be replaced every 6 to 12 months and more often if
necessary. The charcoal filter cannot be cleaned.
TO order a new charcoal filter, contact the Parts
Department at your nearest Authoriz_ Service
Center.
t. Remove the two vent gritle mounting screws.
(2 middle screws)
_/_, ,_,_;_ ....
2. Tip the grille forward, then lift it out
3. Remove old filter.
4. Slide a new charcoal filter into place.
The filter should rest at the angle shown and set the
clock.
5. Slide the bottom of the vent cover into place. Push
the top until it snaps into place, Replace the
mounting screws. Turn the power back on at the
main power supply and set the clock.
- 24