


GREENHEC
K
P.O. BOX 410 SCHOFIELD, WISCONSIN 54476-0410
PH. 715-359-6171
www.greenheck.com
®
SP/CSP models shown are
UL and cUL listed E 33599
SP-B & CSP-B IOM FS
Rev 8 March 2004
Copyright © 2004 Greenheck Fan Corp.
Installation Recommendations
Install the Fan - continued
Wire the Fan
Attach the Grille
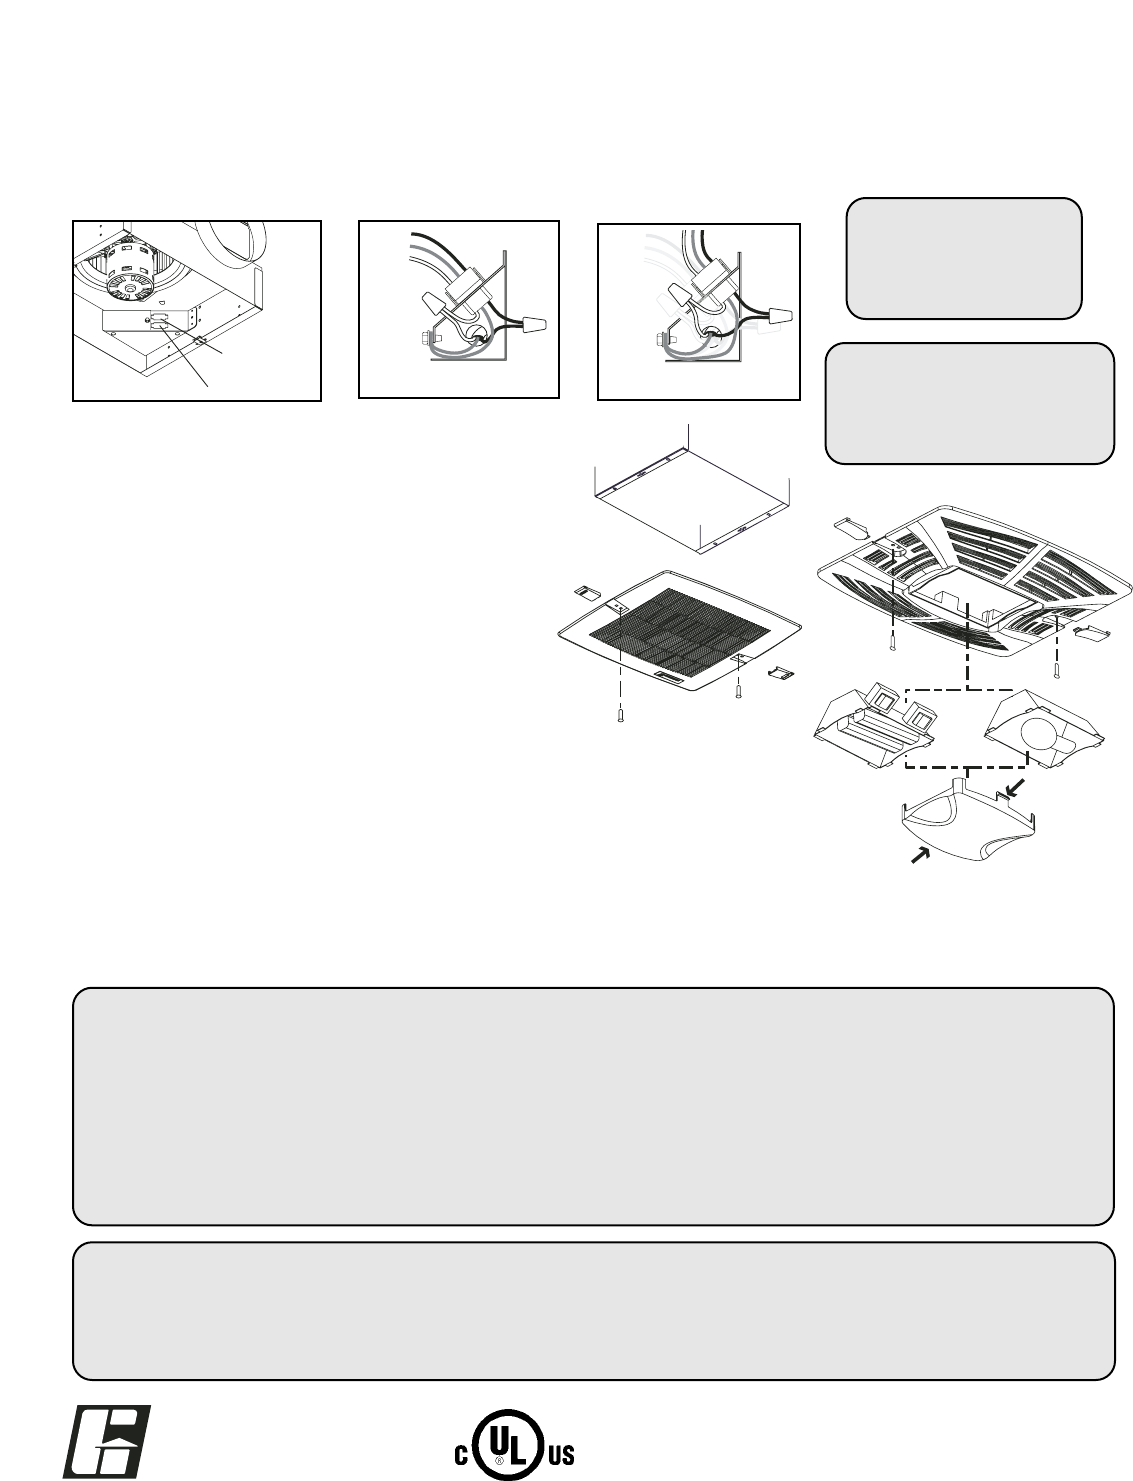
3. Slide ductwork over the fan’s discharge collar and securely attach it with sheet metal screws. Make sure the screws do not
interfere with damper operation. Check damper to make sure it opens freely.
1. If lighted grille is being used, plug wire into fan socket.
If lighted grille and ceiling radiation damper are being
used, plug wire from lighted grille into ceiling radiation
damper socket. Do not plug wire directly into the fan
socket. Make sure the wire does not interfere with the
ceiling radiation damper operation.
2. Attach grille with two screws provided. Make sure not
to over tighten, over tightening will damage grille.
3. Slide attachment screw covers over the attachment
screws, shown in Fig. 10.
4. If lighted grille is being used, install light bulb(s) into light socket(s). For incandescent
lights, use maximum 100 watt bulb (by others). For fluorescent lights, use only
Greenheck’s Part Number 382854, provided, 13 watt flicker resistant light bulbs. For
replacement bulbs please contact Greenheck at phone number 1-800-355-5354.
5. If lighted grille is being used, snap lens into place, by pushing on the outside edges
of lens, shown in Fig. 11. To remove lens, use small screw driver and pry on one side of lens.
6. Turn on power and check fan and light operation.
Fig. 8
Fig. 9a
Fig. 9b
Squeeze tabs to
insert/remove lens
Fig. 11
Warranty
Greenheck warrants this equipment to be free from defects in material and workmanship for a period of three years from
the purchase date. Any units or parts which prove to be defective during the warranty period will be replaced at our option
when returned to our factory, transportation prepaid.
Greenheck will not be responsible for any installation or removal costs.
General Maintenance Suggestions
Model SP/CSP ceiling exhaust fans require very little maintenance. But since small problems over time left unchecked
could lead to loss of performance or early motor failure, we do recommend that the unit be inspected periodically (once or
twice a year).
The fan motor and wheel should be checked for dust and dirt accumulations. Dirt buildup can lead to loss of performance
and motor overheating. Cleaning can be accomplished by brushing off any dust that may have accumulated. Even filtered
units can accumulate build-up and should be checked when cleaning filters.
The motor should be checked for lubrication at this time. Lubricate only those motors which have an oil hole provided. A
few drops of all purpose oil (SAE 20) will be sufficient.
Light
Fan
Fan Outlet (top)
Light Outlet (bottom)
1. Remove wiring cover. If fan/light combination is being used, make sure the fan plug is connected to the fan receptacle and
the light plug is connected to the light receptacle, shown in Fig. 8. Using proper wire connectors, wire the fan as shown in
Fig. 9a. For wiring of light proceed to Fig. 9b.
2. Push all wiring into the unit’s cover and replace wiring cover.
Fig. 10
115 & 277 Volt
Black wire is “Hot”
White wire is “Neutral”
Green wire is “Ground”
220 - 240 Volt
Black wire is “Hot”
White wire is “Hot”
Green wire is “Neutral/Ground”