


3
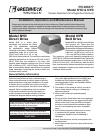
Models NYD & NYB • Tamper-Resistant Centrifugal Roof Exhaust Fans
®
The unit should be stored at least 3½ inches
(89mm) off the floor on wooden blocks covered with
moisture proof paper or polyethylene sheathing.
Aisles between parts and along all walls should
be provided to permit air circulation and space for
inspection.
Outdoor
Fans designed for outdoor applications may be
stored outdoors, if absolutely necessary. Roads or
aisles for portable cranes and hauling equipment are
needed.
The fan should be placed on a level surface to
prevent water from leaking into the fan. The fan
should be elevated on an adequate number of
wooden blocks so that it is above water and
snow levels and has enough blocking to prevent
it from settling into soft ground. Locate parts far
enough apart to permit air circulation, sunlight
and space for periodic inspection. To minimize
water accumulation, place all fan parts on blocking
supports so that rain water will run off.
Do not cover parts with plastic film or tarps as these
cause condensation of moisture from the air passing
through heating and cooling cycles.
Fan wheels should be blocked to prevent spinning
caused by strong winds.
Inspection and Maintenance During
Storage
While in storage, inspect fans once per month. Keep
a record of inspection and maintenance performed.
If moisture or dirt accumulations are found on parts,
the source should be located and eliminated. At
each inspection, rotate the wheel by hand ten to
fifteen revolutions to distribute lubricant on motor. If
paint deterioration begins, consideration should be
given to touch-up or repainting. Fans with special
coatings may require special techniques for touch-
up or repair.
Machined parts coated with rust preventive should
be restored to good condition promptly if signs of
rust occur. Immediately remove the original rust
preventive coating with petroleum solvent and
clean with lint-free cloths. Polish any remaining
rust from surface with crocus cloth or fine emery
paper and oil. Do not destroy the continuity of the
surfaces. Thoroughly wipe clean with Tectyl
®
506
(Ashland Inc.) or the equivalent. For hard to reach
internal surfaces or for occasional use, consider
using Tectyl
®
511M Rust Preventive, WD-40
®
or the
equivalent.
Removing From Storage
As fans are removed from storage to be installed
in their final location, they should be protected
and maintained in a similar fashion until the fan
equipment goes into operation.
Pre-Starting Checks
1. Check all fasteners and setscrews for tightness.
The wheel should rotate freely and be aligned
as shown in figure 2.
2. Wheel position is preset and the unit is test
run at the factory. Movement may occur during
shipment and realignment may be necessary.
3. Centering can be accomplished by loosening
the bolts holding the drive frame to the shock
mounts and repositioning the drive frame.
4. Wheel and inlet cone overlap can be adjusted
by loosening the setscrews in the wheel and
moving the wheel to the desired position.
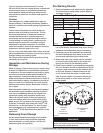
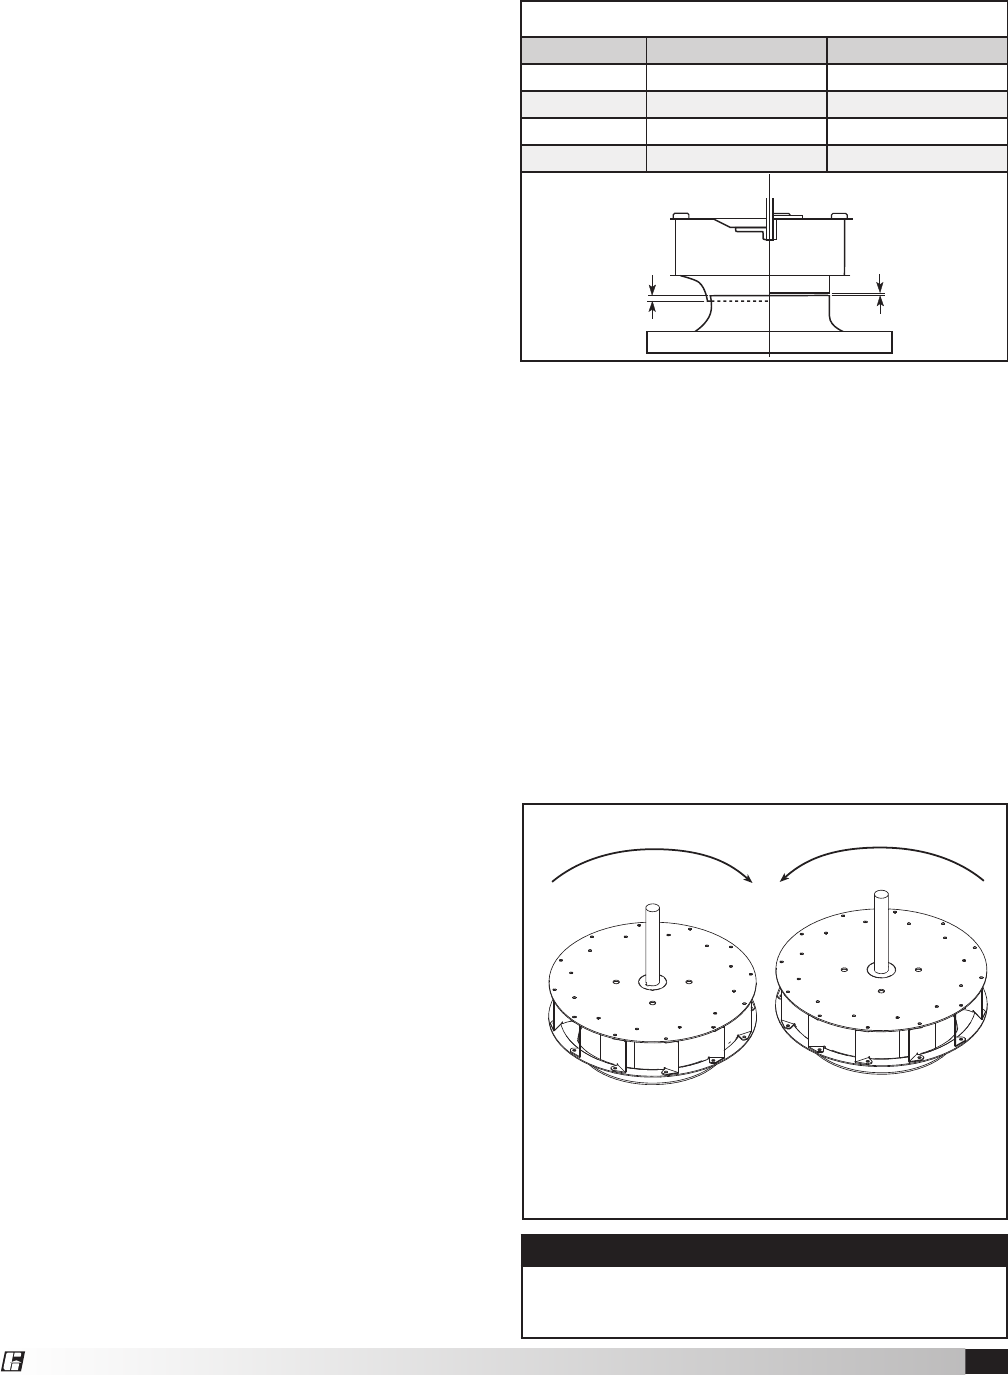
5. Check wheel rotation by momentarily energizing
the unit. Rotation should be clockwise as shown
in figure 3 and correspond to the rotation decal
on the unit. Rotation is determined when the
unit is viewed from the motor or shaft pulley
side. If wheel rotation is incorrect reverse two
of the wiring leads or check motor wiring for
single-phase.
WARNING
Correct direction of wheel rotation is critical. Reversed
rotation will result in poor air performance, motor
overloading and possible burnout.
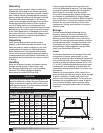
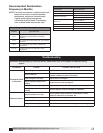
Wheel Overlap Dimensions
Model G - Overlap in. (mm) H - Gap in. (mm)
NYD 075-090 - 3/32 (2)
NYD 075-140 - 1/4
(6)
NYB 100-140 1/4 (6) -
NYB 180-240 3/8
(10) -
Figure 2
G
H
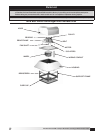
Wheel Rotation (view from top of fan)
NYD 60-130 NYD 140
All NYB Models
Figure 3
Clockwise
Airflow
Counterclockwise
Airflow
Clockwise
Airflow
Counterclockwise
Airflow