


Page 12 Grind’n Brew® Coffee Systems
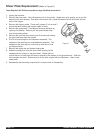
Figure C
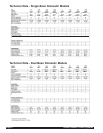
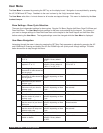
Timer Settings
A standard 64 oz. bottle Grind’n Brew All Airpot Grind’n Brews
• Increase of 1 sec. to timer setting equates to an increase in fluid volume by 1/2 oz.
• Decrease of 1 sec. to timer setting equates to a decrease in fluid volume by 1/2 oz.
Setting Approx. Setting Approx.
Single Bean yield Dual Bean yield
Single/Left Full Pot 4.2 sec. 2 oz. 5.7 sec. 2 oz.
Right Full Pot - - 5.7 sec. 2 oz.
Single/Left Half Pot 2.4 sec. 1.25 oz. 3.0 sec. 1.25 oz.
Right Full Pot - - 3.0 sec. 1.25 oz.
Full Pot 112-125 sec. 62 fl oz. 112-125 sec. 62 fl oz.
Half Pot 56-63 sec. 31 fl oz. 56-63 sec. 31 fl oz.
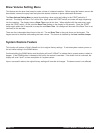
Setting Approx. Setting Approx.
Single Bean yield Dual Bean yield
Single/Left Full Pot 4.5 sec. 2.3 oz. 6.2 sec. 2.3 oz.
Right Full Pot - - 6.2 sec. 2.3 oz.
Single/Left Half Pot 2.7 sec. 1.4 oz. 3.7 sec. 1.4 oz.
Right Full Pot - - 3.7 sec. 1.4 oz.
Full Pot 140-153 sec. 72 fl oz. 140-153 sec. 72 fl oz.
Half Pot 70-77 sec. 36 fl oz. 70-77 sec. 36 fl oz.
Water System Errors
There are three system errors that can be detected by the microprocessor. These errors are:
1. Water Fill Error (Er1) – the water full detection has failed, and the fill valve has been on for at least 5 minutes.
2. Thermistor Error (Er2) – the Thermistor is detected either open, shorted OR the water is boiling.
3.Heater Error (Er3) – the heater has been on for 3 minutes, but no rise in water temperature was detected.
If any of these errors are detected, the unit will shut off all water fill and heat related functions. Brewing is disabled,
but grinding is still allowed. The display will show the error when the unit is idle. To clear any error, the user can
hold in the UP key for 5 seconds, reset power to the unit or enter field test mode.
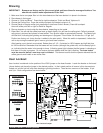
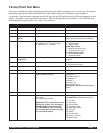
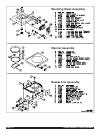
Setting the Grind (Refer to Figure C)
Tools Required: #2 Phillips screwdriver, 7/8" box wrench, large flat blade screwdriver
1. Remove front decal panel by removing screw on underside of
panel and 2 screws on both sides of panel.
2. Loosen adjusting screw lock nut by turning counter clockwise.
3. Turn slotted adjusting screw clockwise to make the grind coarser
or counter clockwise to make the grind finer.
Generally, a 1/8 to 1/4 turn will provide the desired adjustment.
4. After adjustment has been made, re-tighten the adjusting
screw lock nut.
5. Visually inspect the grind adjustment with a small portion of coffee and
readjust if necessary.
6. Reinstall the front decal panel.