


Crathco
®
5512 Manual Page 13
Sanitizing & Refilling (cont.)
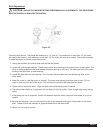
5. Use a clean piece of paper toweling to pick up the large end of the carburetor
from the bottom of the hopper taking care not to touch the sanitized carburetor
with your bare hands.
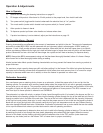
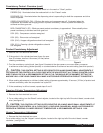
6. Apply the lubricant on the other piece of paper toweling to the two “O” Rings on
the bottom of the carburetor assembly (see figure S).
7. Place the lubricated carburetor assembly on a clean piece of paper toweling.
8. Use either fresh product or mix new product according to manufacturer’s instructions.
9. Fill mix storage hopper with product.
10.Open dispensing valve. Pour product into the hopper and allow this product to
chase out any remaining sanitizer.
11.Watch the product flowing out of the dispensing valve and close the Valve when
the sanitizer remaining in the cylinder has been purged by the new mix.
12.Use a clean piece of paper toweling to insert the sanitized carburetor assembly
into the inlet hole in the hopper (see figure T).
13.Fill mix storage hopper with fresh product.
14.Turn front panel switch to “ON”. Allow approximately 20 to 30 minutes for the
freezer to reach proper consistency. Repeat procedure for other side.
Cleaning Following Complete Disassembly of Unit
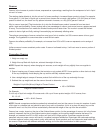
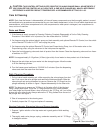
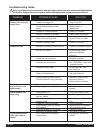
1. Remove knobs and carefully remove the front dispensing valve assembly.
2. Disassemble the dispensing valve assembly by removing the retaining pin,
pushing up on the plunger assembly and pulling out the handle. This will allow
the plunger assembly, complete with O-Rings, to be removed as a unit. Remove
the spring. Remove the O-Rings from the plunger assembly and back of the
dispensing valve body. (See Figure T.)
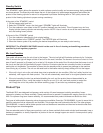
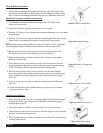
NOTE: The best way to remove an O-Ring is to first wipe off all of the lubricant using
a clean paper towel. Pinch the O-Ring upward with a dry towel between your index fin-
ger and thumb. When a loop is formed in the O-Ring, roll it out of the groove with your
other thumb. Always remove the O-Ring farthest from the end of the plunger first. (See
Figure U).
NOTE: Carefully inspect the O-Rings and replace if necessary.
3. Remove the dasher assembly taking care to avoid damaging the rear seal assem-
bly at the back of the freezing cylinder.
4. Remove stationary portion of the shaft seal assembly from the back end of the
freezer cylinder. This is accomplished by reaching into the cylinder and pulling seal
out with your index finger. (See Figure V).
5. Slide the rotary seal off the the auger shaft. Inspect both seal components care-
fully for nicks or cracks. Replace seal if defective.
NOTE: To prevent leakage both surfaces of the seal must be smooth with no chips or
cracks. Wash all components in a detergent solution, sanitize and allow to air dry.
Figure R Lubricate Carb Tube
Figure S Carb Tube
Figure T Exploded View of
Dispensing Valve
Figure U O-Ring Removal
Figure V Remove stationary
part of seal