


Page 12 Auto Series Brewer Manual
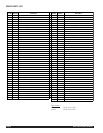
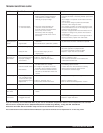
TROUBLESHOOTING GUIDE
Problem Possible Source Check Solution
No Hot Water 1. Tank heater
2. Hi-limit thermostat
or main thermostat
1. Check the voltage at the tank
heater terminals. Voltage should be
120V (230V for E models). Check
serial tag for proper voltage.
2. Check the voltage between the
white wire on the tank heater
terminal and the incoming terminal
(black wire) on the hi-limit
thermostat, then the outgoing
(black wire) terminal on the hi-limit
thermostat.
1. (A) If correct voltage is present at the tank heater
terminals and water is not being heated, replace tank
heater.
(B) If voltage is not present at tank heater terminals,
refer to step 2.
(C) If incorrect voltage is present at tank heater
terminals, check voltage at outlet.
2. (A) If voltage is present on incoming terminal on the
hi-limit thermostat but not on the outgoing terminal,
replace hi-limit thermostat.
(B) Check voltage between black and white wire on
receptacle. If voltage is not present check outlet or
circuit breaker.
(C) If voltage is not present on incoming terminal of
hi-limit thermostat, replace main thermostat.
Steaming or
Spitting Around
Funnel
1. Main thermostat
2. High altitude
1. Thermostat contact stuck or out of
calibration
2. For altitude above 5,000 feet (1,500m)
1. (A) Adjust thermostat to lower temperature setting.
(B) Thermostat should be calibrated or replaced.
Dripping 1. Not siphoning properly
2. Leaky fill valve
1. Water should flow from sprayhead freely
2. Turn off water supply to see if
dripping stops
1. (A) Clean sprayhead holes
(B) Check tightness of sprayhead tube.
(C) Check brass elbow in tank for debris
2. Replace or repair inlet valve as needed
Dry Coffee
Remaining on
Brew Basket
1. Filters
2. Not siphoning properly
3. Improper loading of
brew basket
1. Are correct filters being used
2. Refer to “dripping” step 1
3. Filter and coffee in brew basket
1. Use correct filter
2. Refer to “dripping” step 1
3. Filter should be centered in brew basket and
coffee bed should be level.
Warmer Station 1. Warmer - defective
2. Warmer On/Off switch
3. Bad harness
1. Voltage at warmer terminals should
be 120V (230V for E models).
2. If voltage is not present on warmer
terminals, check continuity of switch
3. Check connections between harness
and switch, and between switch and
warmer.
1. If voltage is present on terminals, but warmer is
not heating, replace warmer.
2. If switch does not make and break continuity
when turned on and off, replace switch.
3. All connections should be tight.
Overflowing 1. Receiving container
not completely empty
at start of brew cycle.
2. Not siphoning properly
3. Adjust timer
1. Operating instructions
2. Refer to “dripping” step 1.
3. Check valve on-time with watch
1. Always start brew cycle with empty container.
2. Refer to “dripping” step 1.
3. Refer to “Brew Volume Adjustment” section
Low Pot Level 1. Adjust timer 1. Check valve on-time with watch 1. Refer to “Brew Volume Adjustment” section
Excessively Long
Brew Times
1. Lime scale build-up 1. Remove spray head deflector and check
nozzle.
1. Delime machine.
Little or No Water
From Faucet
1. Lime scale build-up
2. Clogged inlet valve
Be sure water is turned on. 1. Delime heat exchanger.
2. Replace or repair inlet valve.
If you still need help, call an authorized dealer in your area or Grindmaster Corporation’s Technical Service Department. You can reach
Technical Service at (502) 425-4776 or (800) 695-4500 (USA and Canada only) Monday - Friday, 8:00 AM - 8:00 PM EST.
Please have the model and serial number ready so that accurate information can be given.
Prior authorization must be obtained from Grindmaster Corporation’s Technical Service Department for all warranty claims.