


BAG-IN-BOX HOOK-UP (cont.)
• Flip water switch back to “ON” position.
• Close front door and ensure that both water and product are dispensed simultaneously
HOW TO DISPENSE A CUP OF COFFEE
Warning: Do not use cups over 6 3/4” (15.2 cm) tall with this machine. Use of cups over this height could result in
severe burns and injury.
On models with manual dispense switches:
• Place a cup under the selected drink dispense nozzle.
• Push and hold dispense switch until cup is full and then release switch.
On models with portion control dispense switches:
• Place a cup under the selected drink dispense nozzle.
• Push button for one second, then release to dispense one serving.
Note: Portion may be cancelled by push and release of the switch.
ADJUSTMENTS
PORTION ADJUSTMENT (Portion control units only)
• Place a cup under the selected drink dispense nozzle.
• Press and hold the desired dispense switch and press and release the manual top-off button to activate the programming sequence.
• After a 10 second time delay, the machine is triggered into program mode and will begin dispensing.
• Continue pressing the button until cup is full, then release the switch to prevent overfill. The elapsed portion dispense time is saved to
memory and will remain until the dispense switch is reprogrammed.
• Check the portion size by placing an empty cup under the desired dispense nozzle, then press and release the dispense switch. The
machine will dispense the preprogrammed portion size.
• If the portion size is incorrect, repeat steps 1, 2, 3, 4 & 5 until the desired portion size is achieved.
THERMOSTAT ADJUSTMENT
Note: The thermostat range is approximately 160° to 200°F (71.11°C to 93.33°C). The tank temperature is factory set at 190°F (87.78°C), making
beverage temperature slightly lower than 190°F (87.78°C). The factory setting is recommended for liquid coffee based concentrates. Other
products may require different mixing temperatures. Follow product manufacturer’s recommended mixing water temperature for non-coffee
products.
Temperature can be adjusted as follows:
Tool required: #2 Phillips screwdriver.
• Unplug machine.
• Remove the drip pan.
• Remove the upper splash panel on the front of the machine by removing the (4) Phillips head screws.
• Remove control panel cover by loosening (2) screws enough to allow keyholes in panel to clear the screw heads.
• Locate the thermostat adjustment dial on the left side of the control board.
• To adjust the temperature of the water being dispensed, turn the adjustment dial on the control board. (Turn clockwise to increase the water
temperature or counter clockwise to decrease the water temperature.)
Caution: Do not force the adjustment dial beyond its 270 degrees of rotation or damage to the control board may occur.
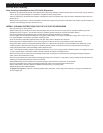
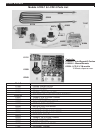
DRINK STRENGTH ADJUSTMENT (Refer to Figure A)
TOOLS REQUIRED: #2 PHILLIPS SCREWDRIVER
Warning: Always disconnect power to the machine before servicing or
cleaning.
Risk of electric shock is present which can cause serious injury or death.
• Dispense a drink to determine if drink is too strong or weak.
• Turn off power to machine at power switch.
• Remove front splash panel below dispense heads in front of machine.
• Locate the mix ratio setting panel directly behind the front splash panel
(see Figure A)
• Adjust drink strength by determining the digital setting for the desired
mix ratio.
(Note: Clockwise will strengthen product, counterclockwise will
weaken the product.)
LCD2-1 & LCD2-3
Figure A
77 77