


AMERICAN METAL WARE
®
BREWERS
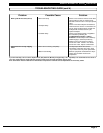
TROUBLESHOOTING GUIDE
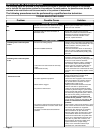
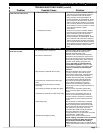
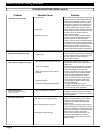
Problem Possible Cause Solution
ERROR MESSAGE
FILLING PROBLEMS
• Check system for water leaks. Correct any
leaks and reset controller.
• Thermistor failure or loose connections in
thermistor circuit.
• Fill valve not sealing properly.
• Fill valve installed backwards.
• High electrode coated with lime or faulty.
• Connection from control board to tank body
faulty.
• Control board is faulty.
• Ensure that connector CN7 is securely
attached to controller and that the thermistor
disconnect is securely connected. Secure
connections and reset controller. If error
reoccurs, replace thermistor.
• Disconnect electrode wire at quick connect
(red wire). Connect a wire from the quick
connect to the cabinet body. If filling stops, this
is the error cause. Remove electrode
assembly and clean the probes. If problem is
not corrected, replace electrode assembly.
• Check to ensure connection (yellow wire) is
secure. Make connection to tank secure.
• Secure connection from control board to metal
enclosure does not stop filling. Replace control
board.
• Check for proper voltage at terminal block.
Check circuit breaker on supply circuit.
Establish electric power to unit.
• Disconnect water supply line and ensure that
water is provided to unit. Check to see that
any and all valves in water line are open.
Establish water supply to unit.
• Water pressure before strainer but not after.
Remove and clean or replace strainer.
• Check for 120V across transformer primary
terminals by disconnecting the quick-connect
for the red and white wires to the transformer
and measuring voltage at this point. If there is
not 120V across primary, proceed to step
entitled “No power to control board and
transformer not powered”. If there is 120V
across primary, proceed to step entitled, “No
power to control board and transformer
powered”.
• Ensure there is 120V across terminal L1 and N
posts. Check connections. Secure connections
and reset circuit breaker on equipment.
• Disconnect quick disconnect on secondary
side of transformer at quick disconnect
between yellow, black, and blue wires. Check
12Vac between black wire and other wires.
Check 24Vac between blue and yellow wires.
If there is no 12Vac between black wire and
either blue or yellow wire or if there is not
24Vac between the blue and yellow wires,
replace transformer. If proper voltage
exists, secure connection between 5 pin
connector CN1 and Control board.
The following procedures must be performed by a qualified service technician.
• Check to see if water enters tank continuously
(usually at a slow rate). Disassemble valve and
clean out debris. Valve may need a new
plunger if seal is worn.
• Look for flow direction arrow on valve body. If
arrow on valve is pointing toward water inlet,
remove valve and install arrow pointing away
from inlet.
• Fill valve on for over 5 min. (This occurs during
initial fill on some units. See Initial Start-up)
• No electrical power to equipment.
• No water supplied to equipment.
• Water strainer clogged.
• No power to control board.
• No power to control board and transformer not
powered-connections not secure and/or circuit
breaker tripped.
• No power to control board and transformer
powered.
Overfilling water tank when power
is OFF
Overfilling water tank when power
is ON
The following pages are provided to help determine the cause of problems with operation of the brewers
and to indicate the appropriate solution for the problems. For each problem, the possible cause should be
checked in the order shown until the exact nature of the problem is determined.
Tank does not refill
ER1
ER2
Page 6