


Assembly
1. Assemble the blade shafts as shown in
Figure 3. When assembled correctly, the
spring pushes the flat parts of the
blades
together. When replacing the blades on the
main shaft (the one connected to the crank
handle), make sure the beveled edge of the
blades are facing the spring side. On the
driven shaft, make sure the beveled sides of
the blades are facing the gear side.
2. Fasten the top half of the jerky slicer onto the
base with the two cap screws.
3. Install the crank handle and secure it in place
with the thumbscrew.
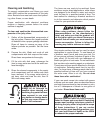
4. Insert the meat alignment combs into each
side of the slicer, as shown in Figure 4.
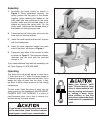
5. Clamp the jerky slicer to the counter or table
as shown in Figure
5. The maximum counter
thickness that will work with the provided
clamps is 1
1
⁄2"
If you need additional help with this assembly, call
our Tech Support at: (570) 546-9663.
Operating
This jerky slicer will accept pieces of meat up to
1" thick and up to 4
3
⁄4" wide. Cut larger pieces to
fit before trying to insert them into the slicer. If you
wedge too large of piece into the slicer, it may
get stuck or place undue pressure on the cutting
components.
To slice meat, insert the piece of meat into the
opening and turn the handwheel. NEVER INSERT
FINGERS INTO THE OPENING! If a piece of
meat becomes stuck, use a fork to remove it or
remove the top for easier access.
Figure 4. Inserting comb.
Figure 5. Jerky slicer clamped to counter.
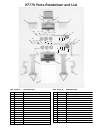
Make your kitchen “child
safe.” Ensure that the jerky
slicer is inaccessible to chil
-
dren by storing out-of-reach
or locking it away. Never
allow children to use this
jerky slicer without the direct
supervision of a responsible
adult.
If you intend to slice different kinds of meat
at the same time, clean the slicer between
meat types to avoid cross contamination.