


15 ENGLISH
OPERATION _______________________________
Preparation
Caution:
7
First time use: Run without adding coffee at least
4 times.
7
Please follow the steps in the “Brewing Coffee”
section from 1 and 3 – 9.
1
Remove all packaging and stickers and
dispose of them according to applicable
legal regulations.
2
Before using of the appliance for first time,
carefully clean all part that come into contact
with water.
(See “Cleaning and care” section).
3
Make sure that the appliance is sitting in an
upright position and on a stable, flat, clean,
dry, and non-slip surface.
Brewing Coffee
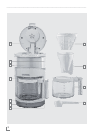
1 Open the water tank cover
A
and use the
glass jug
J
to fill the water tank
C
with
required amount of water, but do not fill past
the ‘max’ mark. The scale on the glass jug is
marked in coffee cups, e.g. 2 = 2 cups. Don´t
operate appliance with less than 2 cups of
water.
Note
7
Use only clean, cold, and fresh drinking water.
2 Fill with the the permanent filter
H
with the
desired amount of ground coffee. To do this,
you may use the supplied measuring spoon
K
.
Note
7
As an alternative to the permanent filter
H
, a
suitable paper filter (1 x 4) may also be used,
which can be inserted directly into the filter
holder
I
.
3 Close the water tank cover
A
.
4 Place the glass jug
J
on the warming plate
E
.
5 Connect the plug to the wall socket.
6 To turn the appliance on, by selecting the On/
Off switch
G
to the “I” position.
– The On/Off switch indicator light
F
illuminates and the brewing process begins.
Notes
7
The brewing process can be stopped at any time
by selecting the On/Off switch
G
to the “O”
position.
7
The appliance is equipped with a drip-stop
D
located underneath the filter holder
I
and
enables you to briefly remove the glass jug
J
to pour coffee before the water has finished run-
ning through the machine.
Caution
7
However make sure to place the glass jug
J
on the support for glass jug
E
quickly (max. 30
seconds). Otherwise brewed the coffee from the
filter could overflow.
7 Remove the glass jug
J
from the warming
plate
E
, as soon as the brewing process has
finished and the glas jug
J
is filled.
8 To turn the appliance off, select the On/Off
switch
G
to the “O” position.
– On/Off switch indicator light
F
and
appliance turns off.
9 Disconnect the appliance from the wall socket.
Notes
7
If you want to continue the brewing process,
repeat the procedure from 1 to 9. Let the appli-
ance cool down between each brewing process
Hints and Tips
7
Use softened or filtered water to prevent lime
build-up.
7
Store unused coffee in a cool, dry place. After
opening a package of coffee, reseal it tightly to
maintain its freshness.
7
Do not reuse coffee since this will reduce the
flavour the coffee.
7
Reheating coffee is not recommended as coffee
is at its peak flavour immediately after brewing.