


English
Directions for use
In the following, you will find all the important
information for the use of your appliance.
The instructions for use apply to several models, which
is why details of the information may differ according to
the type of the appliance.
1 Installation (Choice of position for installation)
Strictly avoid high ambient temperatures and direct
sunlight. We advise you to place your appliance in a
cool, well aired, dry room. Installation in the immediate
vicinity of a heat source (heating, oven etc.) is highly
inappropriate (increased compressor performance
would be necessary and, as a result, power
consumption would be considerably higher).
If the installation near a heat source cannot be avoided,
a suitable insulation plate must be fitted between the
appliance and the heat source (do not use asbestos), or
the following minimum distances must be observed:
from gas or electric cooker
3 cm
from radiator or oven
5 cm
from a wall, piece of furniture or
another appliance
2 cm
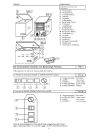
Never obstruct the ventilation grille
Larger chest freezers are equipped with a ventilation
grille (F) located below on one side. These appliances
can be placed directly against a wall or a piece of
furniture but not with the side protected with the
ventilation grille.
Freezers without ventilation grille
Leave sufficient space between the rear of the
appliance and the wall to ensure that outward flow of
warm air is able to escape.
The appliance must be placed horizontally and on a
levelled base. Only this way can an impeded circuit of
the refrigerant and optimum function be ensured.
IMPORTANT!
Leave the appliance stand in the final position for
at least 2 hours before switching it on, so that the
refrigerant circuit stabilises and no operating
problems occur.
The odour which is typical of all new appliances is easy
to remove.
Thoroughly clean the interior compartment with a
mixture of
lukewarm water and vinegar
.
Do not use washing liquids, sharp or granular
cleaning implements, or any cleaning products
containing soda.
Before connecting the appliance, make sure that the
inner area – especially the corners – is absolutely dry.
Danger warning
Depending on its composition, the refrigerant is easily
inflammable. The refrigerant circuit is hermetically
sealed and the
density
has been subject to repeated
tests.
An improper intervention can cause acute fire hazard.
Instruction for use
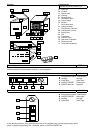
Omit any mechanical influence on the cooling system,
especially on the following accessible parts in the
compressor chamber
(L)
:
Rear wall condenser or skin condenser (R)
Compressor (P)
(motor)
Capillary tube (Q)
Drying filter (N)
Interventions on the cooling system must be carried out
by professional and authorised personnel only.
IMPORTANT!
Escaping refrigerant can injure your eyes.
In the event of eye contact with the refrigerant, wash
your eyes instantly under plenty of running water and
call/consult an eye specialist immediately.
2 Rating plate
The rating plate (with technical data) is located on the
housing (D) at the rear of the appliance.
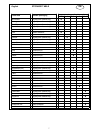
Take a note of the technical data
Copy the technical data from the rating plate to here so
that it is at any time readily available, without having to
move the appliance
Model/Type …………….…………………………
Net capacity ………………….……………litres
Operating voltage ………………….……...…...V-50Hz
Maximum absorbed power(W)..……………….Watt
Safety (A) ……………….....………………......Amp
Power consumption………………………….....kWh/24h
Freezing capacity…………………………….....kg/24h
3 Connection to power supply
Your appliance must be connected to a power socked
with grounded connection, which is conform to the
respective standards and has been installed by an
authorised specialist.
Before you connect the plug of the appliance with the
power socket, make absolutely sure that
the voltage (V) on the appliance’s data-plate
corresponds with that of your mains.
If the voltage differs, notify the after-sales-service or
your dealer immediately, and do not on any account
connect the appliance to the mains.
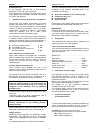
4temperature selection
(Thermostat) (FIG.4)
To prevent temperature being accidentally modified, the
control is intentionally resistant to turning. To vary the
setting, we recommend to use a coin or screwdriver.
To switch on:
Turn the control to the right
adjust temperature to the level you require, between:
-
Min.
(slight cooling) and
-
max
. (lowest temperature)
2