


Installation
Cold water connection
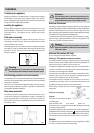
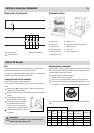
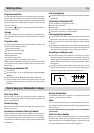
Connect the water supply hose to a water outlet tap, making sure that it is
fastened tightly in place (see fig.A). Make sure the rubber washer is seated
firmly in the bottom of the connector.
If the water pipes are new or have not been used for an extended period of time,
let the water run to make sure that the water is clear and free of impurities. If this
precaution is not taken, there is a risk that the water inletcan get blocked and
damage the appliance.
Positioning the appliance
Positioning the appliance in the desired location. The back should rest against
the wall behind it, and the sides, along the adjacent cabinets or wall. The dish-
washer is equipped with water supply and drain hoses that can be positioned to
the right or the left to facilitate proper installation.
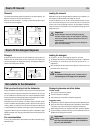
Levelling the appliance
Once the appliance is positioned, adjust the feet (screwing them in or out) to
adjust the dishwasher, making it level. In any case, the appliance should not be
inclined more than 2˚. If the appliance is level, it will help ensure proper
performance.
Warning
The appliance is to be connected to the water mains using
new hose-sets and that old hose-sets should not be reused.
fig.A
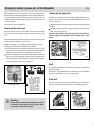
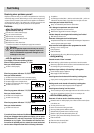
Drain hose connection
Insert the drain hose into a drain pipe with a minimum diameter of 4cm, or let it
run into the sink, making sure to avoid bending or crimping it. If necessary, fit a
syphon trap (U-bend) with a connecting piece for the drain hose (fig.B). The
free end of the hose must be at a height between 40 and 100 cm and must not
be immersed in water.
Attention:
The connecting piece for syphon trap (U-bend) must be
solidly fastened to the wall to prevent the drain hose from
moving and allowing water to spill outside the drain.
Electrical Connection
After making sure that the voltage and frequency values for your home correspond
to those on the rating plate (located on the stainless steel inner door of the appliance)
and that the electrical system is correct for the maximum voltage on the rating
plate, insert the plug into an electrical socket which is earthed properly (the earthing
of the appliance is a safety requirement mandated by law).
If the electrical socket to which the appliance must be connected is not appro-
priate for the plug, replace the whole cable, rather than using adaptors or the
like as they could cause overheating and burns.
Caution:
The dishwasher plug must be accessible even when the
appliance is installed as a built-in unit so that maintenance
can be done safely.
Anti-Flooding protection (for some models)
Your dishwasher has an overfill protection device which could automatically shut
off the inlet valve and starts the drain pump if the water level in the unit is detected
to be above the normal level.
If this occurs, turn off the main water supply before calling for servicing. If there is
water in the base pan because of an overfill or small leak, the water should be
removed before restarting the dishwasher.
2
EN
fig.B
Electrical Connection (Uk Only)
For your safety please read the following information.
Caution:
The dishwasher plug must be accessible even when the appliance is installed
as a built-in unit so that maintence can be done safety.
Warning: This appliance must be earthed.
The appliance must be connected to a 220-240 volts 50 cycle AC supply by
means of a three pin socket, suitably earthed and should be protected by a 13
amp fuse in the plug or a 15 amp fuse in the consumer unit.
The appliance is supplied with a moulded 13 amp 3 pin mains plug fitted with a
13 amp fuse. Should the fuse require replacement, it must be replaced with a
fuse rated at 13 amp and approved to BS1362.
The plug contains a removable fuse cover that must be refitted when the fuse is
replaced. In the event of the fuse cover being lost or damaged, the plug must
not be used until a replacement cover has been obtained.
If the moulded mains plug is unsuitable for the socket outlet in your home or is
removed for any other reason, then the fuse should be removed and the cut off
plug disposed of safely to prevent the hazard of electric shock.
There is a danger of electric shock if the cut off plug is inserted into any 13 amp
socket outlet.
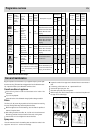
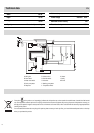
How to wire a 13 amp plug.
Important
The wires in the mains lead on this appliance are coloured in accordance with
the following code:
Green and Yellow - Earth Blue – Neutral Brown – Live
As the colours may not correspond with the markings identifying the terminals
in your plug proceed as follows.
The green and yellow wire must be connected to the terminal in the plug which is
marked with the letter E or with the earth symbol or coloured green and yellow.
The blue wire must be connected to the terminal marked N or coloured black.
The brown wire must be connected to the terminal marked L or coloured red.